Reindeer Treats
There’s something about the holidays that brings out the kid in all of us, and what better way to celebrate than with these adorable Reindeer Treats? I remember the first time I made these delightful little snacks for a holiday party. Everyone was so captivated by their charm! The blend of creamy textures with sweet and salty crunches creates an experience that’s not just a treat but a celebration. These treats are perfect for family gatherings, and they’re super fun to make with kids. We’d gather around the table, laughter filling the air, as we crafted our little reindeer. The joyful chaos of frosting, candy, and pretzels transforming into whimsical characters is a memory I cherish. Plus, they make for great gifts or a festive addition to any dessert table!
Recipe Snapshot
20 mins
20 mins
0 mins
Easy
180 kcal
2 g
Keto, Gluten-Free, Low FODMAP
8 g
Piping bag, resealable plastic bag
Why You Need This Reindeer Treats
They’re Fun to Make
I absolutely love how interactive these Reindeer Treats are. Kids can help with decorating, making it a perfect family activity during the holidays. It’s not just about the final product; it’s about the memories created along the way!
Perfect for Any Gathering
Whether it’s a Christmas party, a school function, or just a cozy evening at home, these treats bring joy! Their cute appearance makes them an instant hit, and they’re sure to spark conversations and smiles.
Unique Flavor Combinations
The combination of cream cheese frosting, Reese’s Cups, and pretzel twists creates a delightful mix of flavors. The sweet and salty contrast is simply irresistible!
Versatile Ingredients
What’s fantastic about these treats is their flexibility. You can substitute ingredients or experiment with different candies and decorations, making them your own personalized creation.
Great for Gifting
These Reindeer Treats make fantastic gifts! Package them in a cute box with a ribbon, and you have a sweet surprise for friends and family.
Visually Appealing
Let’s face it, who can resist the charm of these little reindeer? Their playful design is eye-catching and adds a festive touch to any setting. They’re as pleasing to the eyes as they are to the taste buds!
What’s In This Reindeer Treats
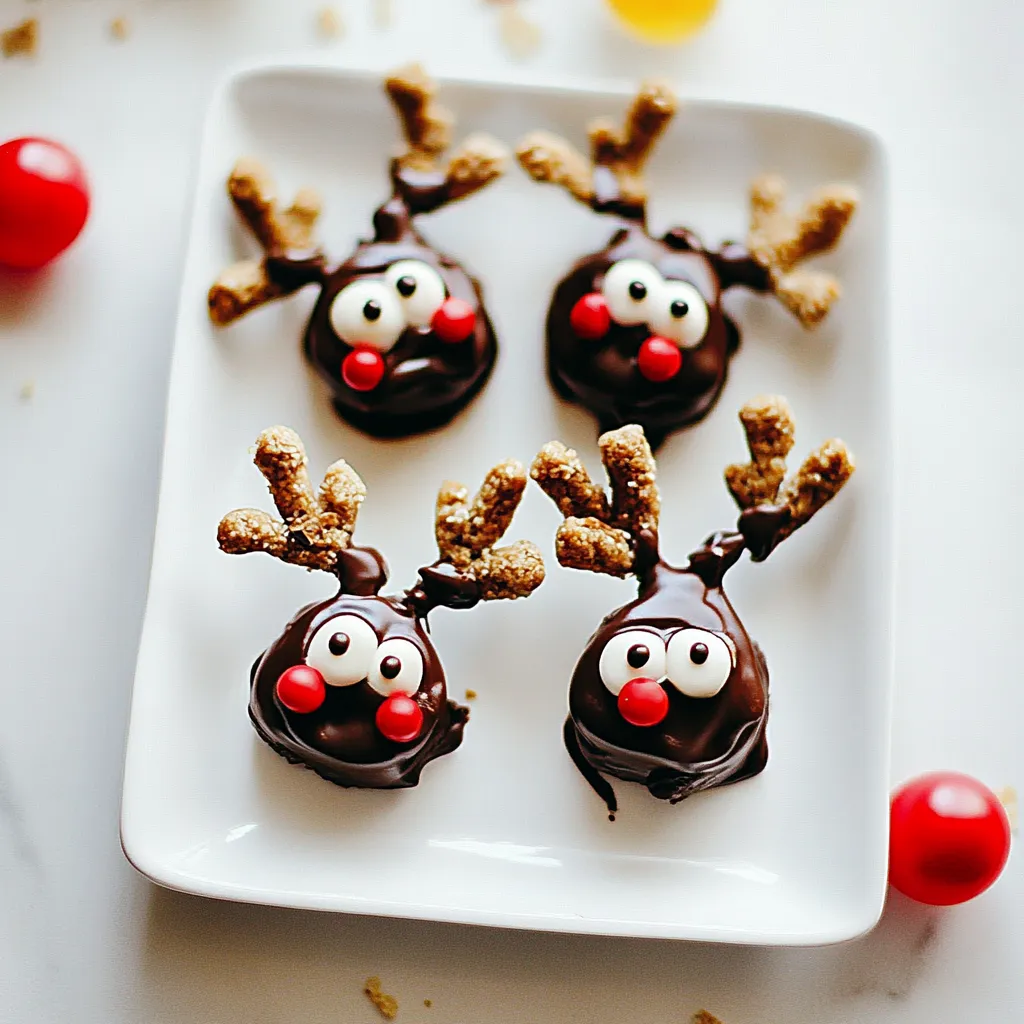
These adorable Reindeer Treats are crafted with love using simple ingredients that work harmoniously together. Each component has a role to play, creating a delightful snack that’s perfect for the season. The key players include the rich cream cheese frosting that binds everything together, the sweet Reese’s Cups that serve as the body, and pretzel twists that provide an enjoyable crunch.
- 1/3 cup cream cheese frosting or homemade frosting or peanut butter – This creamy base helps to hold the treats together and adds a sweet flavor.
- 20 Miniature Reese’s Cups – These are the star of the show, providing a rich chocolatey taste that everyone loves.
- 1 bag pretzel twists – The perfect crunchy addition that also doubles as antlers!
- 20 Miniature Red M&M’s – These add a pop of color and fun, serving as the reindeer’s nose.
- 40 candy eyeballs – These cute little decorations give our reindeer their personality!
Step by Step Instructions for Reindeer Treats

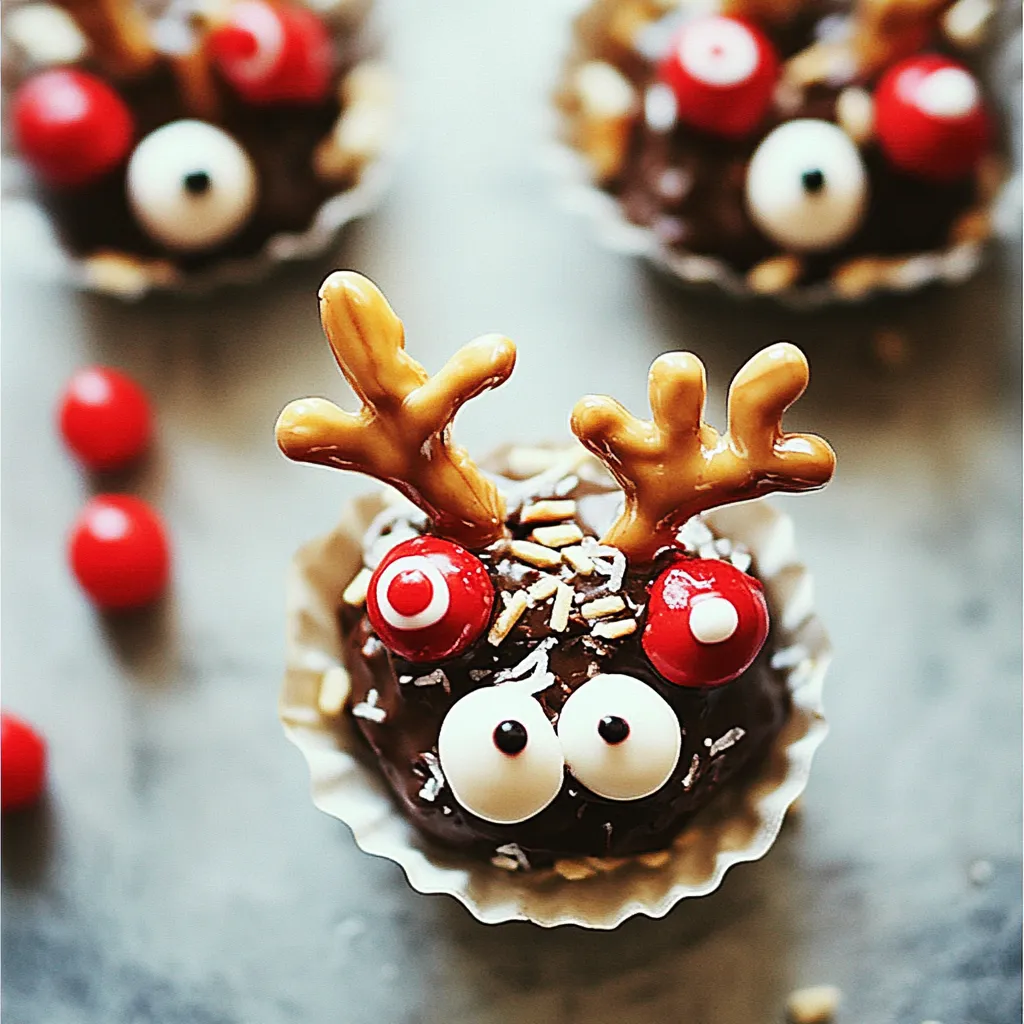
Creating these delightful Reindeer Treats is a fun process that anyone can enjoy! Follow these easy steps to bring these little guys to life. They’re perfect for adding a festive touch to your holiday celebrations.
- Fit a frosting bag with a #2 or #3 tip and fill it with cream cheese frosting. If you don’t have a piping bag, simply fill a resealable plastic bag with frosting and cut the very tip off one corner. This will work just fine as a frosting bag!
- Take the pretzel twists and break them in half. You may need to break off smaller pieces to resemble antlers. Don’t worry if some pieces break; it’s all part of the fun! After breaking a few, you’ll get the hang of it.
- Frost the back of each pretzel “antler” with a bit of frosting. Carefully press them into the top of the Reese’s Cups. Make sure they stick well!
- Using the frosting, attach the candy eyeballs below the pretzel antlers. This gives your reindeer their adorable face!
- Next, take the mini red M&M and place it below the candy eyeballs as the nose. It’s the finishing touch that really brings your reindeer to life!
- Continue to press and secure any pieces that aren’t sticking until everything is firm and secure. Enjoy the creative process and have fun with it!
Things Worth Knowing
- Make it a group activity: These treats are perfect for crafting with friends or family. Set up a decorating station!
- Experiment with toppings: Don’t hesitate to add different candies or color combinations to personalize your reindeer.
- Be patient: If things don’t stick right away, give it a moment. The frosting will set!
- Presentation matters: Arrange your treats in a festive tray for a lovely presentation at events.
Expert Tips about Reindeer Treats

Making Reindeer Treats is a delightful experience, but a few tips can help you elevate the process. Here are some expert insights to ensure your treats turn out perfectly.
- Storage: Store leftover Mini Reindeer Treats in an airtight container at room temperature for up to five days. Keep them in a single layer to avoid damaging the decorations.
- Freezing: You can freeze these treats for up to a month. Just ensure they’re in a single layer to prevent sticking. Thaw them at room temperature before serving.
- Pairing: Serve these treats alongside hot cocoa or eggnog for a festive beverage pairing.
- Variations: Consider using different candies for the nose or eyes to create unique versions of your reindeer!
- Presentation: Place the treats on a decorated platter or in treat bags for gifting; they look even more special!
- Have fun! Don’t stress about perfection. The charm of these treats is in their whimsical, handmade look!
Pairing Suggestions for Reindeer Treats
When it comes to serving Reindeer Treats, there are plenty of delightful options to complement them!
- Hot Cocoa: There’s nothing like warm, rich hot cocoa to pair with these sweet treats. The flavors go hand-in-hand!
- Christmas Cookie Plate: Add these to a plate of assorted cookies for a festive dessert spread.
- Holiday Parties: They make excellent additions to any holiday gathering, sure to please both kids and adults alike!
- Gift Giving: Wrap these treats in cute packaging to give as gifts to friends and family during the holiday season.
- School Events: Perfect for school parties, these treats will be a hit among children and teachers alike!
- Seasonal Themes: Feel free to adapt the decorations for other holidays like Valentine’s Day or Halloween for a year-round treat!
FAQ
Conclusion
These Reindeer Treats are a delightful way to celebrate the festive season. Their whimsical appearance and delicious flavor make them a must-try for anyone looking to add some fun to their holiday treats. I encourage you to gather your family, get creative, and make these little reindeer together. You’ll create sweet memories that last a lifetime!
Reindeer Treats
Equipment
- Piping bag
- resealable plastic bag
Ingredients
- 1/3 cup cream cheese frosting or homemade frosting or peanut butter
- 20 Miniature Reese’s Cups
- 1 bag pretzel twists
- 20 Miniature Red M&M’s
- 40 candy eyeballs
Instructions
- Fit a frosting bag with a #2 or #3 tip and fill with frosting. Alternatively, fill a resealable plastic bag with frosting and cut of the very tip of the corner of the bag with scissors. This will work as a frosting bag.
- Break the pretzel twists in half and further break off pieces to get them to look like antlers. A lot will just break and not work out, but after breaking a few, it gets easier.
- Frost the back of the pretzel “antlers” and gently press into the top of the Reese’s cup.
- Using the frosting, attach the candy eyeballs using frosting below the pretzel antlers.
- Using the frosting, attach the mini red M&M below the edible eyes as a nose.
- Continue to press and secure any of the pieces that aren’t sticking until firm. Enjoy 🙂
Notes
- Storage: Store leftover Mini Reindeer Treats in an airtight container at room temperature for up to five days. Keep them in a single layer to avoid damaging the decorations.