Seven Layer Dip
There’s something incredibly inviting about a dish like Seven Layer Dip. Whether it’s game day, a casual gathering, or just a cozy night in, this dip always finds its way to the table. I remember the first time I made it for a friend’s party. I was a bit nervous about how it would turn out, but the moment I placed that beautiful layered creation in front of everyone, it was love at first sight! The colors, the textures, and the aroma of the fresh ingredients created a buzz even before anyone took a bite. It quickly became a favorite, and now, it’s a staple in our home. You can’t help but dig in, and I promise, there’s never a leftover!
Recipe Snapshot
25 mins
25 mins
0 mins
Medium
180 kcal
6 g
Keto, Gluten-Free, Low FODMAP
10 g
Frying Pan, Wooden Spoon, Chef’s Knife, Skillet
Why This Seven Layer Dip Works
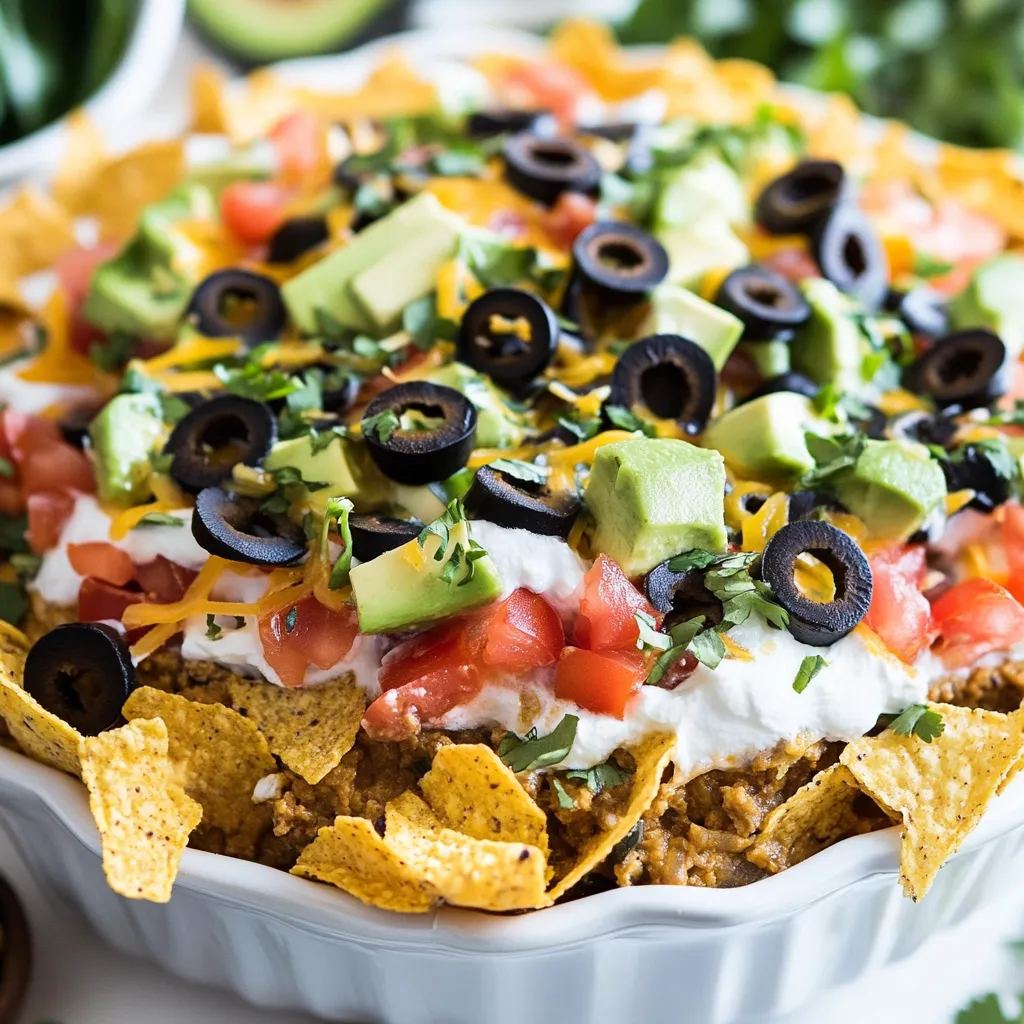
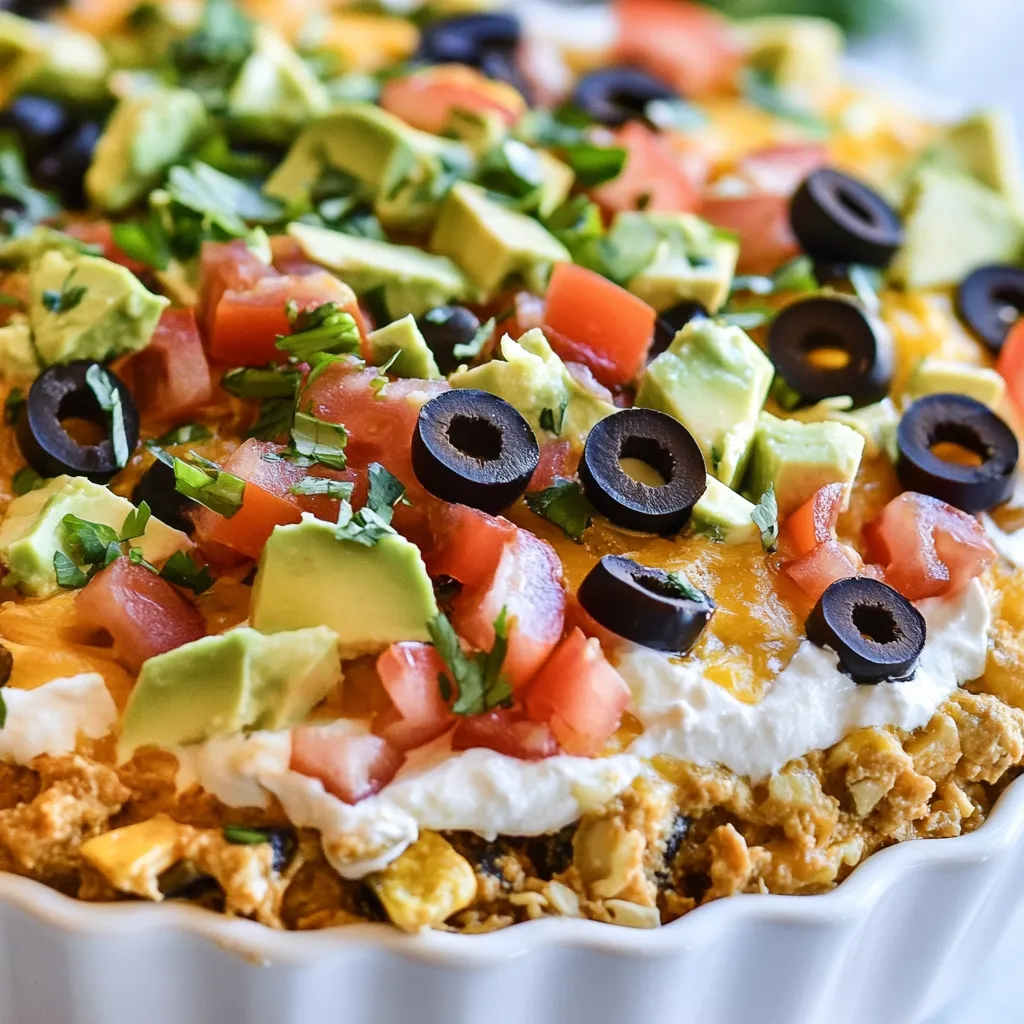
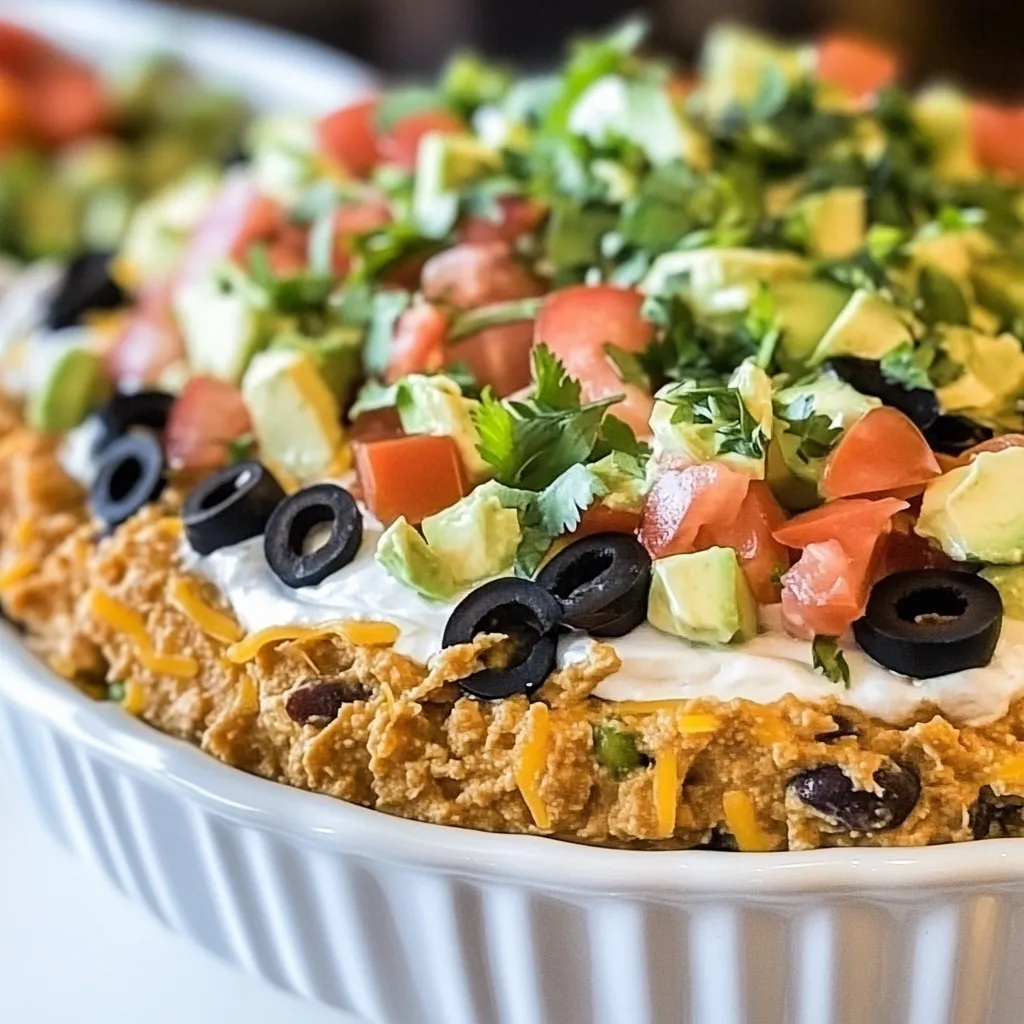
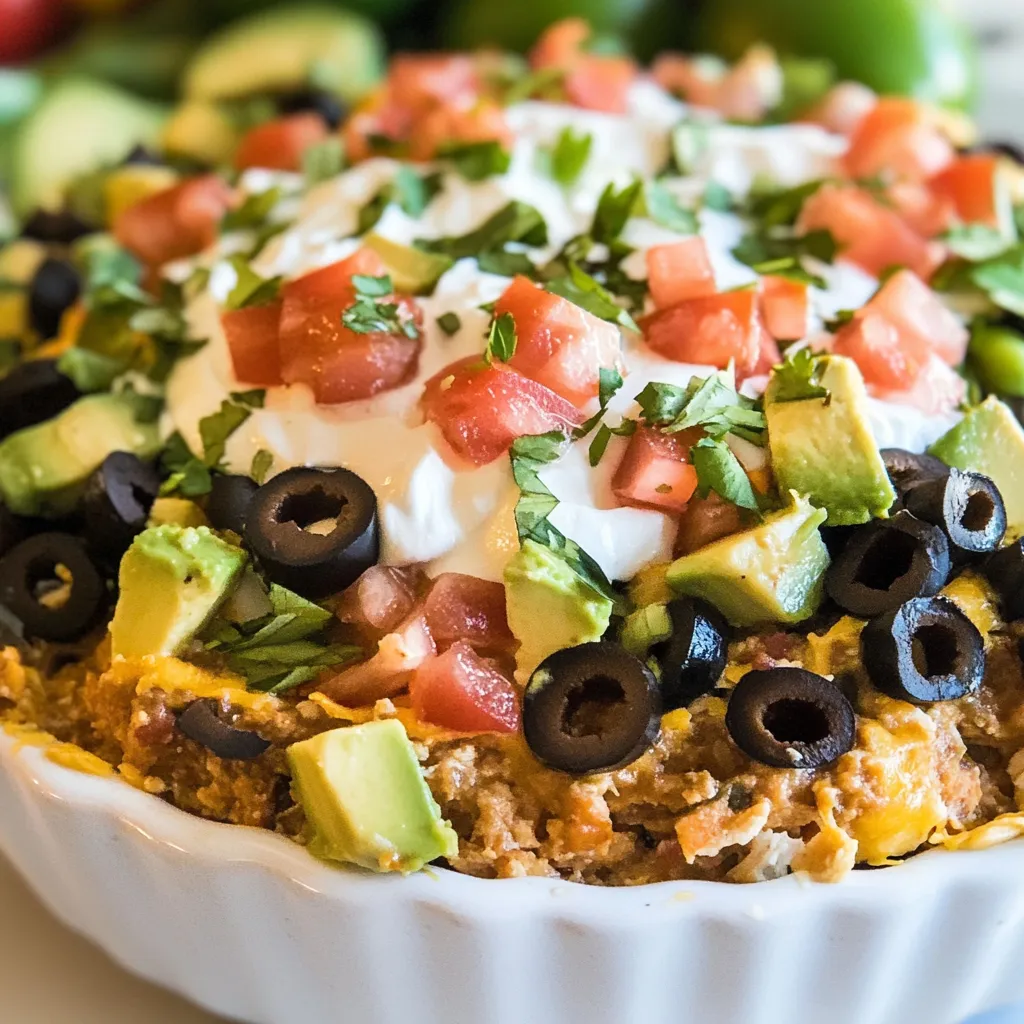
It’s a Visual Treat
The first thing that strikes you about Seven Layer Dip is its stunning presentation. With colorful layers of ingredients, it’s a feast for the eyes. Each layer peeks out, showcasing the vibrant greens of the avocado, the bright red of the tomato, and the rich browns of the refried beans. It’s almost too pretty to eat—almost!
Perfect for Sharing
There’s something wonderful about sharing food, and this dip is perfect for that. Gather your friends and family around, grab some tortilla chips, and let everyone scoop up their own portions. It encourages camaraderie and conversation, making any gathering feel more special. Plus, who doesn’t love a hands-on approach to dining?
Customizable to Your Taste
One of the best parts about Seven Layer Dip is how customizable it is. Don’t like olives? Leave them out! Want to add some extra spice? Throw in some jalapeños! You can mix and match the layers to suit your preferences, making it a dish you’ll never tire of.
Quick and Easy to Prepare
When you’re in a pinch for time, this dip comes to the rescue. It’s quick to put together and doesn’t require any fancy cooking skills. Just layer each ingredient, and you’re good to go! You can prepare it ahead of time, chill it in the fridge, and bring it out when guests arrive.
Great for Any Occasion
It doesn’t matter if it’s a casual Friday night or a festive celebration; Seven Layer Dip fits the bill. It’s versatile enough for any occasion, whether it’s a family gathering, a game night, or a summer BBQ. You can even serve it at potlucks, and trust me, it won’t last long!
Delicious Combination of Flavors
The layers of flavors in this dip are simply irresistible. From the creamy mashed avocado to the tangy sour cream, every bite offers something unique. It’s a delightful mix of textures and tastes that keeps you coming back for more.
Shopping List for Seven Layer Dip
Choosing the right ingredients for Seven Layer Dip is crucial for achieving that perfect blend of flavors and textures. Each component plays a role, from the creamy beans to the zesty toppings. The combination of these ingredients not only creates a delicious dip but also brings a variety of tastes that everyone will enjoy. Let’s take a look at what you’ll need!
- 15 ounce can refried beans: The base layer that provides a rich, creamy texture. This is the heart of the dip, packed with flavor.
- ¼ cup water: Helps to adjust the consistency of the refried beans, making it easier to spread.
- 1 teaspoon olive oil: Adds a touch of richness and helps to sauté the beans, enhancing their flavor.
- 1 teaspoon chili powder: Brings a warm, smoky flavor that pairs beautifully with the creamy beans.
- ¼ teaspoon ground cumin: Adds depth and an earthy note to the dip, amplifying the overall taste.
- Salt, to taste: Essential for enhancing the flavors of all the ingredients.
- 4 ounces cheddar or Monterey Jack cheese, shredded: Provides a cheesy layer that adds creaminess and richness.
- 1 jalapeño pepper: Adds a kick of heat; be sure to remove the seeds if you prefer it milder.
- 2 avocados, mashed: A creamy layer that brings freshness and a buttery texture.
- 1 tomato: Adds freshness and acidity, balancing out the richness of the other ingredients.
- 1 cup sour cream: Provides a tangy contrast and creamy texture that rounds out the dip.
- 2.25 ounce can sliced black olives: Adds a briny flavor that complements the other layers nicely.
How to Assemble Seven Layer Dip
Assembling Seven Layer Dip is as enjoyable as devouring it! The layering process allows you to see each ingredient come to life. Let’s dive into the steps to create this masterpiece. Follow along closely, and you’ll have a beautiful dip ready in no time!
- Start by placing the refried beans in a medium sauté pan or cast iron skillet over medium-low heat. Stir in the water, olive oil, chili powder, ground cumin, and salt, stirring until everything is well combined. The beans should become hot and bubbly, indicating they are ready to be layered.
- Once the beans are warm, carefully spread them over the bottom of a 9-inch pie plate or a suitable serving dish. Make sure the layer is even and covers the bottom completely for a solid base.
- Next, sprinkle the shredded cheddar or Monterey Jack cheese over the warm beans. This will start to melt slightly, creating a delicious cheesy layer that everyone will love.
- Now it’s time to layer on the finely chopped jalapeño pepper. Spread it evenly for that perfect hint of spice. It adds great color and flavor to the dip.
- Next, we’ll add the creamy, mashed avocados as the next layer. Spread it smoothly over the jalapeños, creating a rich barrier of flavor.
- Now, chop the tomato, ensuring to remove the seeds and juices to avoid excess moisture. Sprinkle the diced tomato over the avocado layer, adding freshness and color.
- Then, carefully spread the sour cream over the tomatoes, creating a beautiful, creamy layer that contrasts with the other ingredients beautifully.
- Finally, top the dip with the sliced black olives. Arrange them neatly to make it look inviting. This final layer brings in a salty flavor that complements the dip perfectly.
- Serve immediately with crunchy tortilla chips. The layers should remain distinct, and every scoop should be a burst of flavor!
Things Worth Knowing
- Layering is Key: Make sure to layer each ingredient carefully to maintain the structure and visual appeal.
- Temperature: Serve the dip at room temperature for the best flavor.
- Ingredient Quality: Use fresh ingredients for a more vibrant taste.
- Chill Before Serving: Allow the dip to chill for a bit in the fridge to let the flavors meld together.
Helpful Notes about Seven Layer Dip
Making Seven Layer Dip is straightforward, but a few helpful tips can enhance your experience. Here are some insights to keep in mind:
- Storage: If you have leftovers, store them in an airtight container in the refrigerator. Enjoy within two days for the best flavor.
- Freezing: It’s not recommended to freeze this dip, as the textures may become unpleasant after thawing.
- Pairing: This dip pairs wonderfully with tortilla chips, but you can also serve it with pita chips or fresh veggies.
- Variations: Feel free to add in or swap out ingredients like corn, bell peppers, or even meat alternatives for a different twist.
- Make-Ahead: You can prepare the layers ahead of time and assemble just before serving for maximum freshness.
Pairing Suggestions for Seven Layer Dip
Serving Seven Layer Dip can be as fun and creative as making it! Here are some great ideas to enjoy this delicious dip:
- Game Day: It’s a must-have for any sports gathering. Serve it alongside beer or homemade lemonade.
- Casual Gatherings: Perfect for informal meet-ups with friends. Pair with a variety of chips like corn, tortilla, or even veggie sticks.
- Summer BBQs: This dip is a refreshing option that complements grilled foods. Serve it as a side with burgers and hot dogs.
- Picnics: Pack it up in a cooler for a day out in the sun. It’s a great companion to sandwiches and salad.
- Celebrations: Ideal for birthday parties or casual get-togethers. Add some festive decor to elevate the presentation!
- Storage Tips: Keep any leftovers covered in the fridge. Just note that the layers may start to blend over time.
FAQ
Conclusion
Seven Layer Dip is more than just a dip; it’s a celebration of flavors that brings people together. From its vibrant layers to the ease of preparation, it’s a dish that can elevate any occasion. I encourage you to give it a try!
Gather your ingredients and get ready to impress your friends and family. After all, who can resist a hearty and delicious dip that’s great for sharing?

Seven Layer Dip
Equipment
- Frying Pan
- Wooden Spoon
- Chef's Knife
- Skillet
Ingredients
- 15 ounce Refried Beans
- ¼ cup Water
- 1 teaspoon Olive Oil
- 1 teaspoon Chili Powder
- ¼ teaspoon Ground Cumin
- to taste Salt
- 4 ounces Cheddar or Monterey Jack Cheese shredded
- 1 Jalapeño Pepper finely chopped, seeds and membrane removed
- 2 Avocados mashed
- 1 Tomato seeds and juices removed, finely chopped
- 1 cup Sour Cream
- 2.25 ounce Sliced Black Olives
Instructions
- Start by placing the refried beans in a medium sauté pan over medium-low heat. Stir in the water, olive oil, chili powder, ground cumin, and salt, stirring until everything is well combined. The beans should become hot and bubbly, indicating they are ready to be layered.
- Once the beans are warm, carefully spread them over the bottom of a 9-inch pie plate or a suitable serving dish. Make sure the layer is even and covers the bottom completely for a solid base.
- Next, sprinkle the shredded cheddar or Monterey Jack cheese over the warm beans. This will start to melt slightly, creating a delicious cheesy layer that everyone will love.
- Now it’s time to layer on the finely chopped jalapeño pepper. Spread it evenly for that perfect hint of spice. It adds great color and flavor to the dip.
- Next, we’ll add the creamy, mashed avocados as the next layer. Spread it smoothly over the jalapeños, creating a rich barrier of flavor.
- Now, chop the tomato, ensuring to remove the seeds and juices to avoid excess moisture. Sprinkle the diced tomato over the avocado layer, adding freshness and color.
- Then, carefully spread the sour cream over the tomatoes, creating a beautiful, creamy layer that contrasts with the other ingredients beautifully.
- Finally, top the dip with the sliced black olives. Arrange them neatly to make it look inviting. This final layer brings in a salty flavor that complements the dip perfectly.
- Serve immediately with crunchy tortilla chips. The layers should remain distinct, and every scoop should be a burst of flavor!
Notes
- Storage: If you have leftovers, store them in an airtight container in the refrigerator. Enjoy within two days for the best flavor.
- Freezing: It’s not recommended to freeze this dip, as the textures may become unpleasant after thawing.
- Pairing: This dip pairs wonderfully with tortilla chips, but you can also serve it with pita chips or fresh veggies.
- Variations: Feel free to add in or swap out ingredients like corn, bell peppers, or even meat alternatives for a different twist.
- Make-Ahead: You can prepare the layers ahead of time and assemble just before serving for maximum freshness.