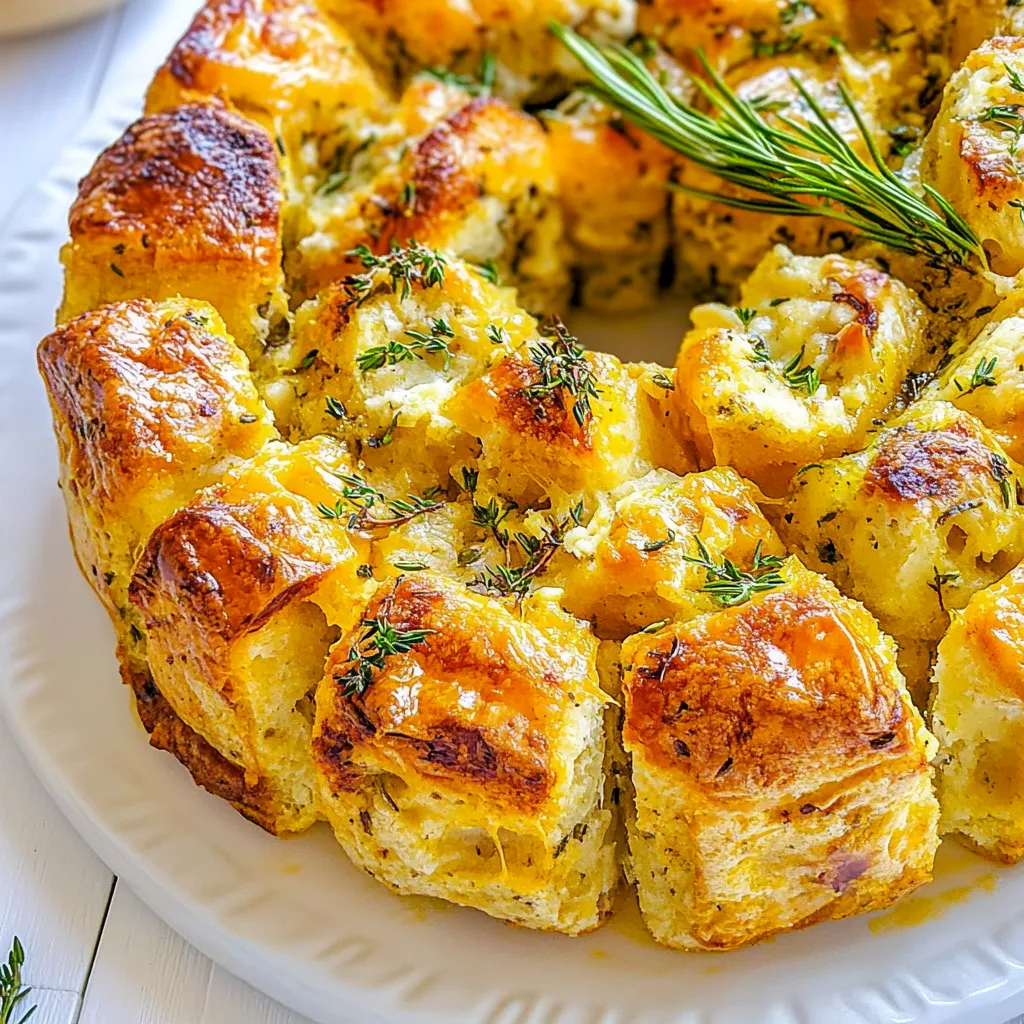
Pull Apart Stuffing Ring
Nothing quite says comfort like a warm and inviting Pull Apart Stuffing Ring during the fall season. I remember the first time I made this dish; it was a chilly Thanksgiving afternoon, and the aroma of herbs and buttery goodness filled the kitchen. Family gathered around, their eyes lighting up at the sight of the golden-brown ring, ready to be pulled apart and enjoyed. This recipe has become a staple in our home, perfect for those cozy gatherings or even just a fun weekday dinner. Each fluffy piece is bursting with flavor, and the best part? You can customize it with your favorite herbs and spices!
Recipe Snapshot
60 mins
15 mins
45 mins
Medium
280 kcal
4 g
Gluten-Free
16 g
Mixing Bowl, Baking Sheet, Wooden Spoon, Skillet, Whisk, Frying Pan, Oven, Food Processor, Peeler, Cutting Board
The Best Thing About This Pull Apart Stuffing Ring
Unforgettable Flavor Combination
What makes the Pull Apart Stuffing Ring so special is the harmonious blend of ingredients. The combination of rich, unsalted butter with aromatic herbs like sage, thyme, and rosemary creates a depth of flavor that’s simply irresistible.
Perfect for Any Occasion
This recipe is incredibly versatile. Whether it’s Thanksgiving, a family gathering, or even a casual dinner, the Pull Apart Stuffing Ring fits right in. It’s not just a dish; it’s a centerpiece that invites conversations and memories around the table.
Easy to Prepare
You don’t need to be a gourmet chef to whip this up! The steps are straightforward, allowing even novice cooks to shine. From sautéing the onion and celery to mixing in the biscuit dough, each step is simple yet fulfilling.
Interactive Dining Experience
What I love most about this dish is the interactive eating experience. Each pull creates a moment of excitement and sharing among family and friends. It’s a fun way to engage everyone at the table, turning a meal into a gathering.
Ideal for Leftovers
If you’re lucky enough to have leftovers, they store beautifully! Just keep the stuffing ring in an airtight container and enjoy it warm for up to five days. I often find myself heating up the remnants for a quick lunch, and it tastes just as good as the first time!
Ingredients Overview for Pull Apart Stuffing Ring

The ingredients used in the Pull Apart Stuffing Ring play a crucial role in delivering its signature flavor and texture. Each component has a purpose, from the buttery richness of unsalted butter to the fresh and vibrant herbs that bring everything to life. You’ll find that the star players here are the biscuit dough, which provides the fluffy, pull-apart aspect, and the seasonings that create a mouthwatering aroma.
- ½ cup unsalted butter (1 stick) – Adds richness and moisture, making the stuffing irresistibly moist.
- 1 small to medium white or yellow onion (diced small) – Provides sweetness and depth of flavor when sautéed.
- 2 cups celery stalks (diced small) – Brings crunch and a fresh taste that complements the herbs.
- 4 large sage leaves (finely minced) – Offers a warm, earthy flavor that’s essential for stuffing.
- 2 teaspoons fresh thyme (finely minced) – Adds a subtle, aromatic note that balances the dish.
- 2 teaspoons fresh rosemary (finely minced) – Contributes a robust flavor that enhances the other herbs.
- ½ teaspoon salt (or to taste) – Enhances all the natural flavors of the ingredients.
- ½ teaspoon freshly ground black pepper (or to taste) – Adds a little heat and aromatic quality.
- 3 to 4 cloves garlic (finely minced) – Delivers rich, savory notes that elevate the stuffing.
- 1 large egg – Binds the mixture together and helps with the texture.
- ½ cup flat leaf parsley (finely minced; divided) – Provides freshness and a pop of color.
- Two 8-count cans refrigerated biscuit dough (each can is about 16 ounces, quarter each biscuit) – The main ingredient that gives the stuffing its unique pull-apart characteristic.
- Extra sage, thyme sprigs, or rosemary (optional for garnishing) – Adds a beautiful finishing touch for presentation.
Cooking Method for Pull Apart Stuffing Ring

Preparing the Pull Apart Stuffing Ring is a rewarding experience that fills your kitchen with amazing aromas. Let’s dive into the steps that will lead you to this delightful dish. Follow along, and soon you’ll be pulling apart warm pieces of stuffing ring, enjoying every flavorful bite.
Preheat your oven to 325°F (163°C). Start by spraying a 9-inch Bundt pan (approximately 10 cup capacity) very well with cooking spray to ensure easy release after baking. This step is crucial to avoid any sticking, which can ruin the presentation of your beautiful stuffing ring.
In a large sauté pan over medium-high heat, add the unsalted butter, along with the diced onion, and celery. Sauté these ingredients for about 4 to 5 minutes, stirring frequently. You want the onions to be translucent and the celery to soften, creating a fragrant base for your stuffing.
Next, add the finely minced sage, thyme, rosemary, salt, and pepper to the pan. Stir well, allowing the herbs to release their aromas and blend beautifully with the sautéed vegetables.
After about a minute of stirring, add the garlic and continue to cook for an additional minute. You’ll know it’s ready when the garlic becomes fragrant. Be careful not to burn it, as that can lead to a bitter taste.
Now, transfer this warm mixture to a large mixing bowl and let it cool for about five minutes. This step is essential; if the mixture is too hot, adding the egg will cause it to scramble, which we definitely want to avoid!
Once cooled, crack in the egg and whisk it together with the veggie and herb mixture until well combined. This will help bind your stuffing ingredients together.
Add the quartered biscuit dough pieces to the bowl. Gently toss and stir to coat them evenly in the buttery mixture. Although it may look like there’s too much butter at first, don’t worry! It will soak into the dough during baking, creating the most delicious stuffing.
Transfer about half of the mixture into the prepared Bundt pan. Sprinkle half of the parsley over this layer. This not only adds flavor but also a nice visual element.
Repeat the process with the remaining mixture, adding it to the pan and topping with the rest of the parsley. Cover the Bundt pan tightly with nonstick foil to help keep moisture in.
Place the pan in the oven and bake for 30 minutes. After that time, carefully remove the foil and continue baking for another 15 to 20 minutes. The stuffing ring should be golden brown and, if using a digital thermometer, the internal temperature should read 160°F (71°C).
When it’s done, remove the Bundt pan from the oven and let it cool on a wire rack for about 5 minutes. This cooling time helps it firm up, making it easier to invert without breaking.
To serve, gently run a butter knife around the edges of the pan. Invert the Bundt pan over a plate or cutting board. For an impressive presentation, place your final serving platter over the pan and perform a second inversion. This helps maintain the beautiful shape of the stuffing ring.
Finally, if desired, garnish your stuffing ring with fresh herbs before serving. You can enjoy it warm, pulling pieces apart with your hands, or serve it with a spoon. Enjoy every delicious bite!
Things Worth Knowing
- Cooling Process: Letting the sautéed mixture cool before adding the egg is crucial. This prevents the egg from cooking prematurely, ensuring a smooth texture.
- Texture Check: When mixing in the biscuit dough, it may seem overly buttery at first, but trust the process! The biscuits will absorb the butter during baking, creating a wonderfully moist stuffing.
- Double Inversion: The double inversion technique ensures your stuffing ring maintains its shape. It’s worth the extra step for visual appeal!
- Internal Temperature: Always check the internal temperature with a digital thermometer. This ensures your stuffing is safely cooked through.
Helpful Notes about Pull Apart Stuffing Ring

This Pull Apart Stuffing Ring is a wonderful dish to make ahead of time or to enjoy fresh. Here are some tips to keep in mind:
- Storage: Keep any leftovers airtight in the fridge for up to 5 days. Reheat in the oven for the best texture.
- Freezing: You can freeze the stuffing ring for up to 4 months. Just make sure it’s well wrapped to prevent freezer burn.
- Pairing: This stuffing ring pairs beautifully with roasted vegetables or a fresh salad for a complete meal.
- Customization: Feel free to mix in different herbs or spices to suit your taste. Adding dried cranberries or nuts can enhance the flavor profile.
- Make it Your Own: Experiment with different types of biscuit dough, such as buttermilk or herbed varieties for added flavor.
What to Pair With Pull Apart Stuffing Ring
When it comes to serving the Pull Apart Stuffing Ring, the possibilities are endless. Here are some fantastic pairings that will elevate your meal:
- Roasted Vegetables: Serve alongside a medley of roasted seasonal vegetables such as carrots, brussels sprouts, and sweet potatoes.
- Fresh Salad: A crisp green salad with a zesty dressing complements the rich, buttery stuffing beautifully.
- Gravy: Consider offering a side of gravy for drizzling over the top. It adds an extra layer of flavor that everyone will love.
- Thanksgiving Dinner: This stuffing ring is perfect for Thanksgiving spreads, adding a unique twist to the traditional stuffing.
- Casual Dinners: It’s also great for casual dinners with friends or family, making any meal feel special without much effort.
- Brunch Option: Serve it at brunch with a side of scrambled eggs and fresh fruit for a delightful morning treat.
FAQ
Conclusion
The Pull Apart Stuffing Ring is not just a dish; it’s an experience that brings friends and family together around the table. Its warm, inviting flavors and fun presentation make it a must-try for any gathering. I encourage you to give it a go, and I promise it will become a beloved recipe in your home, just like it has in mine.

Pull Apart Stuffing Ring
Equipment
- Mixing Bowl
- Baking Sheet
- Wooden Spoon
- Skillet
- Whisk
- Frying Pan
- Oven
- Food Processor
- Peeler
- Cutting Board
Ingredients
- ½ cup unsalted butter 1 stick
- 1 small to medium white or yellow onion diced small
- 2 cups celery stalks diced small
- 4 large sage leaves finely minced
- 2 teaspoons fresh thyme finely minced
- 2 teaspoons fresh rosemary finely minced
- ½ teaspoon salt or to taste
- ½ teaspoon freshly ground black pepper or to taste
- 3 to 4 cloves garlic finely minced
- 1 large egg
- ½ cup flat leaf parsley finely minced; divided
- 2 cans refrigerated biscuit dough each can is about 16 ounces, quarter each biscuit
- Extra sage, thyme sprigs, or rosemary optional for garnishing
Instructions
- Preheat your oven to 325°F (163°C). Start by spraying a 9-inch Bundt pan (approximately 10 cup capacity) very well with cooking spray to ensure easy release after baking. This step is crucial to avoid any sticking, which can ruin the presentation of your beautiful stuffing ring.
- In a large sauté pan over medium-high heat, add the unsalted butter, along with the diced onion, and celery. Sauté these ingredients for about 4 to 5 minutes, stirring frequently. You want the onions to be translucent and the celery to soften, creating a fragrant base for your stuffing.
- Next, add the finely minced sage, thyme, rosemary, salt, and pepper to the pan. Stir well, allowing the herbs to release their aromas and blend beautifully with the sautéed vegetables.
- After about a minute of stirring, add the garlic and continue to cook for an additional minute. You’ll know it’s ready when the garlic becomes fragrant. Be careful not to burn it, as that can lead to a bitter taste.
- Now, transfer this warm mixture to a large mixing bowl and let it cool for about five minutes. This step is essential; if the mixture is too hot, adding the egg will cause it to scramble, which we definitely want to avoid!
- Once cooled, crack in the egg and whisk it together with the veggie and herb mixture until well combined. This will help bind your stuffing ingredients together.
- Add the quartered biscuit dough pieces to the bowl. Gently toss and stir to coat them evenly in the buttery mixture. Although it may look like there’s too much butter at first, don’t worry! It will soak into the dough during baking, creating the most delicious stuffing.
- Transfer about half of the mixture into the prepared Bundt pan. Sprinkle half of the parsley over this layer. This not only adds flavor but also a nice visual element.
- Repeat the process with the remaining mixture, adding it to the pan and topping with the rest of the parsley. Cover the Bundt pan tightly with nonstick foil to help keep moisture in.
- Place the pan in the oven and bake for 30 minutes. After that time, carefully remove the foil and continue baking for another 15 to 20 minutes. The stuffing ring should be golden brown and, if using a digital thermometer, the internal temperature should read 160°F (71°C).
- When it’s done, remove the Bundt pan from the oven and let it cool on a wire rack for about 5 minutes. This cooling time helps it firm up, making it easier to invert without breaking.
- To serve, gently run a butter knife around the edges of the pan. Invert the Bundt pan over a plate or cutting board. For an impressive presentation, place your final serving platter over the pan and perform a second inversion. This helps maintain the beautiful shape of the stuffing ring.
- Finally, if desired, garnish your stuffing ring with fresh herbs before serving. You can enjoy it warm, pulling pieces apart with your hands, or serve it with a spoon. Enjoy every delicious bite!
Notes
- Tip 1: Keep any leftovers airtight in the fridge for up to 5 days.
- Tip 2: You can freeze the stuffing ring for up to 4 months.
- Tip 3: This stuffing ring pairs beautifully with roasted vegetables or a fresh salad.
- Tip 4: Feel free to mix in different herbs or spices to suit your taste.
- Tip 5: Experiment with different types of biscuit dough for added flavor.