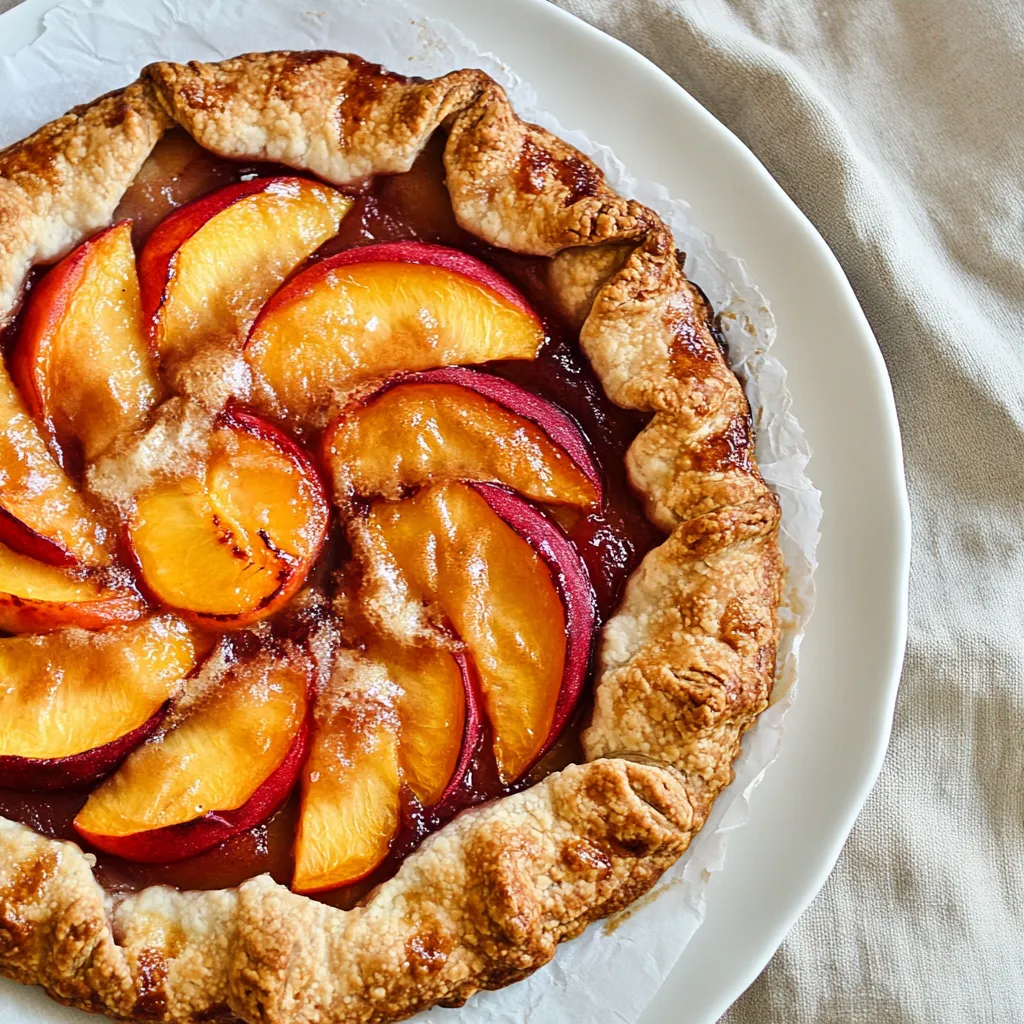
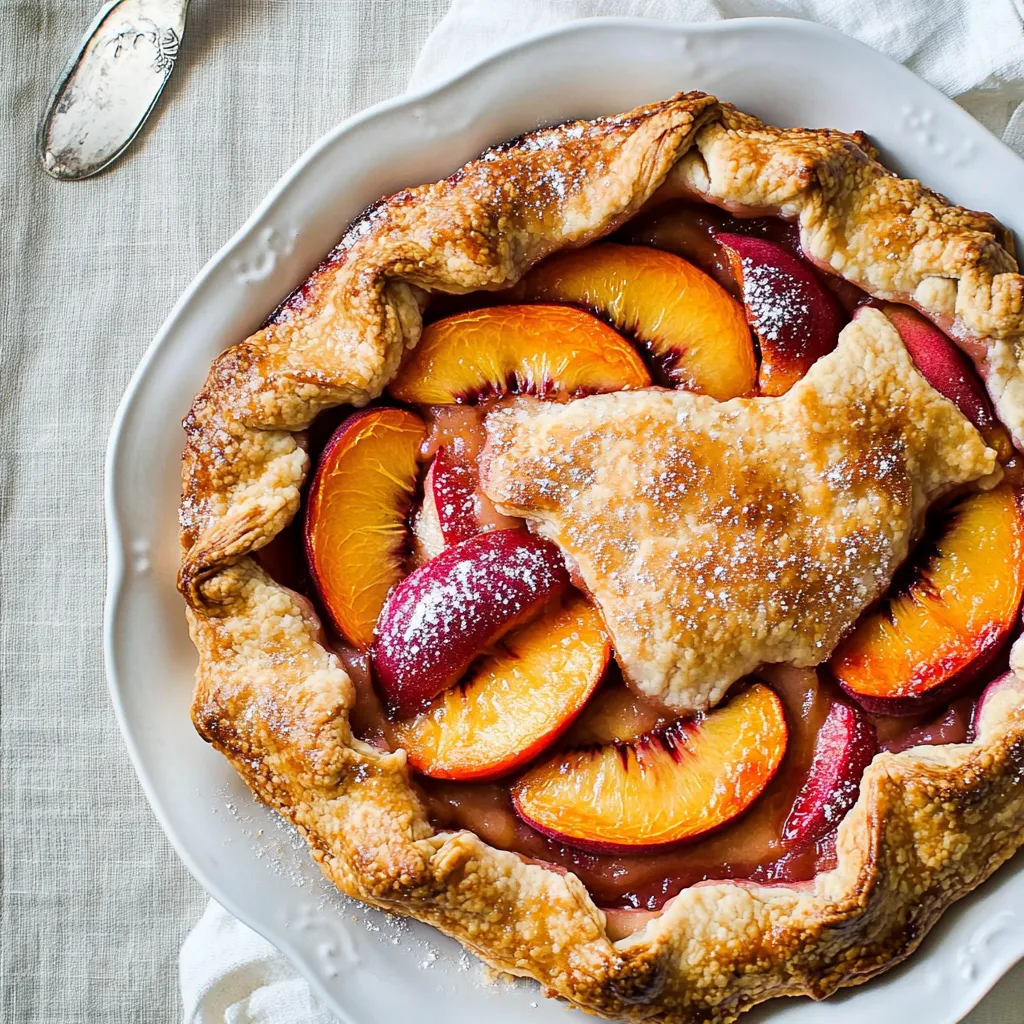
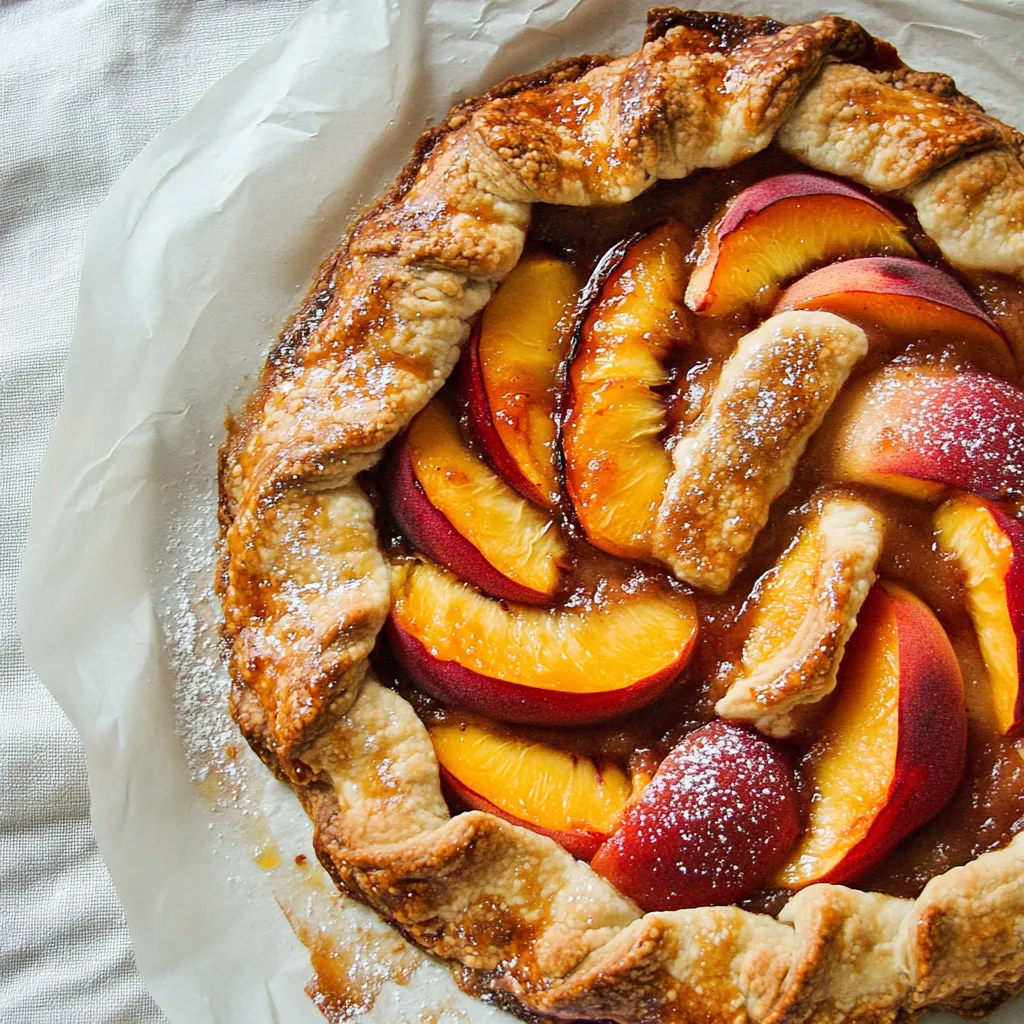
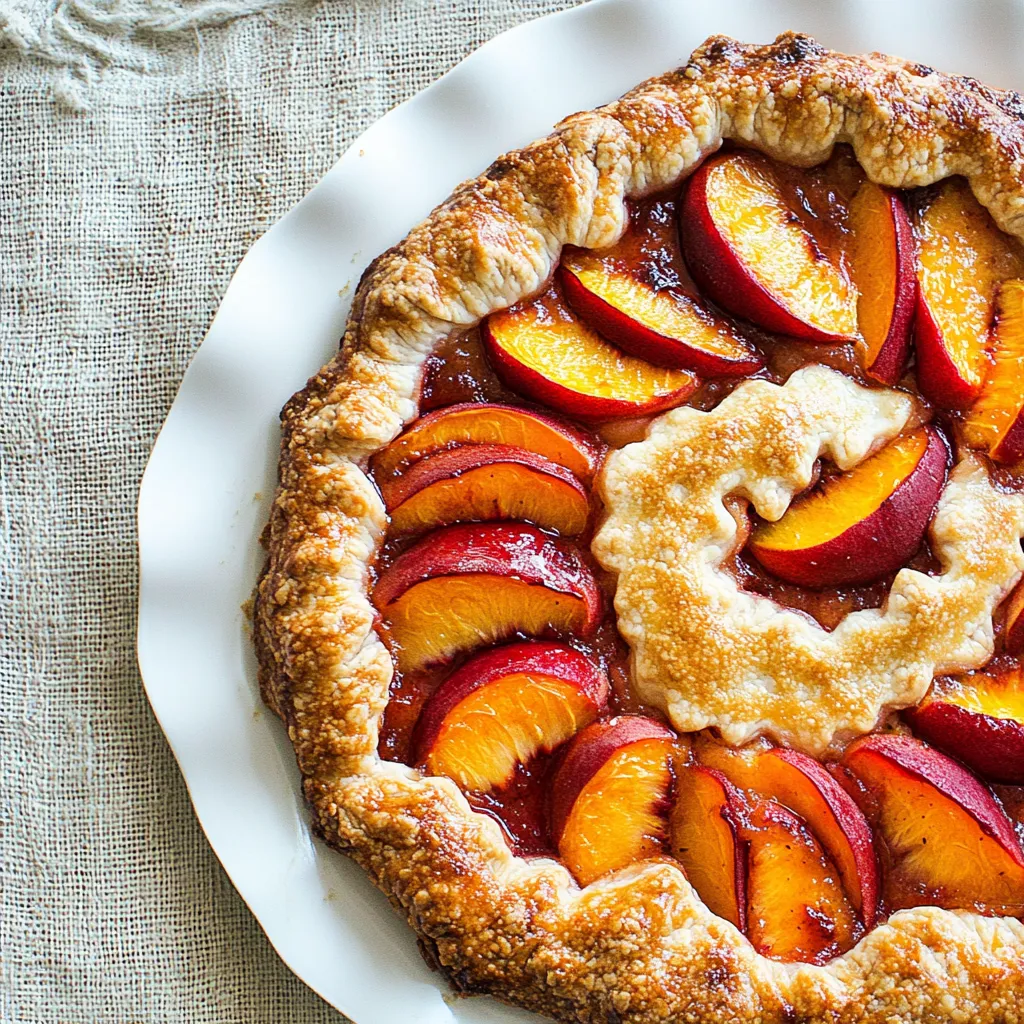
Peach Galette
There’s something magical about the simplicity of a Peach Galette. Growing up, my family would gather during the summer for a fruit-picking escapade, filling our baskets with ripe peaches. After a long day in the sun, we’d return home, and the kitchen would fill with the sweet aroma of baked goods. That’s where the Peach Galette came into play. The rustic charm of this dessert, with its flaky crust and juicy peach filling, brings back those cherished memories. It’s the perfect way to celebrate summer’s bounty. When I serve it, I can almost hear the laughter and chatter of my family around the table. This galette is not just a dessert; it’s a reminder of warm, sunny days spent together.
Recipe Snapshot
1 hr 40 mins
80 mins
20 mins
Medium
290 kcal
3 g
Gluten-Free, Low FODMAP
15 g
Mixing Bowl, Baking Sheet, Chef’s Knife, Wooden Spoon, Oven, Food Processor
What You’ll Enjoy About This Peach Galette
1. Simplicity at Its Best
The beauty of the Peach Galette lies in its straightforwardness. You don’t need to be a professional baker to create a stunning dessert. With just a handful of ingredients, you can whip up a delightful treat that impresses everyone. The combination of fresh peaches and a light, flaky crust is simply irresistible.
2. Ideal for Summer Gatherings
Summer is the season for gatherings, and the Peach Galette is the ideal centerpiece. Whether you’re hosting a backyard barbecue or a casual dinner with friends, this dessert is always a crowd-pleaser. Serve it warm with a scoop of vanilla ice cream, and you have a dessert that feels special yet effortless.
3. Versatile Ingredients
Another reason to love this galette is its versatility. While peaches shine in this recipe, you can easily adapt it to include other summer fruits like cherries or berries. This flexibility allows you to personalize the recipe based on your favorite fruits or what you have on hand. Each variation tells a different story while sticking to the foundational flavors.
4. A Rustic Charm
The rustic appearance of the Peach Galette makes it feel homemade and heartfelt. Unlike traditional pies, which can be intimidating with their intricate crust designs, the galette embraces imperfection. The edges can be folded or layered in a carefree manner, making it feel warm and inviting. Plus, there’s something satisfying about slicing into a galette and revealing the juicy filling inside.
5. Perfect for Any Occasion
Not only is the Peach Galette a fantastic summer dessert, but it also works beautifully for various occasions. From casual family dinners to holiday feasts, it adapts to the moment. The comforting flavors remind you of home, making it a wonderful choice for gatherings.
6. Simple Yet Elegant
There’s a true elegance in the simplicity of the Peach Galette. With minimal effort, you can create a dessert that looks and tastes fancy. Guests will be impressed by your baking skills, but you’ll know how easy it really was!
What Goes Into Peach Galette
The ingredients of the Peach Galette come together in a harmonious way, creating a beautiful balance of flavors and textures. Each component plays a vital role in achieving that perfect bite. The flaky crust pairs wonderfully with the juicy peaches, while the sugar and spices enhance the natural sweetness of the fruit.
- All-purpose flour: The base of the crust, providing structure while allowing for a tender, flaky texture. Measuring it correctly ensures your dough is just right.
- Granulated sugar: Adds sweetness to the dough and the filling, helping to balance the tartness of the peaches.
- Fine sea salt: A pinch of salt enhances the flavors of the dessert, making the sweet notes pop.
- Unsalted butter: Cold butter is crucial for making a flaky crust. It creates steam pockets during baking that contribute to the texture.
- Ice water: Helps bring the dough together without warming the butter, ensuring a flaky crust.
- Egg: Works as a wash on the crust, giving it a beautiful golden color and a slight shine.
- Coarse sugar: Sprinkled on top before baking, it adds a delightful crunch to the crust.
- Peaches: The star of the show! Fresh, ripe peaches provide a juicy and sweet filling that embodies summer.
- Cinnamon: A warm spice that complements the sweetness of the peaches beautifully.
- Pure vanilla extract: Enhances the overall flavor, adding depth to the peach filling.
- Unsalted butter (for filling): Dotting the peaches with butter before baking enriches the filling and adds richness.
Making This Peach Galette
Creating a Peach Galette is a delightful process, allowing you to engage with every step. From making the dough to assembling the galette, each moment builds anticipation. Follow these steps closely, and you’ll see how easy it is to create a stunning dessert that will fill your home with the aroma of baked peaches.
- Start by preparing your dough. In a food processor, pulse together the all-purpose flour, granulated sugar, and fine sea salt until combined. This will form the base of your crust. It’s crucial that these dry ingredients are well mixed before adding the butter.
- Next, cut the cold unsalted butter into small cubes, about half an inch, and add it to the food processor. Pulse it 8 to 10 times until the butter pieces resemble small peas. This step is essential for achieving that flaky texture in your crust, so be careful not to overdo it.
- Now, add the ice water one tablespoon at a time, pulsing between each addition. You’ll know your dough is ready when it begins to clump together. It’s crucial to avoid overworking the dough at this stage.
- Form the dough into a disk, pressing it gently. Don’t knead it; just pat it together. Dust it with flour on all sides and wrap it in plastic wrap. Refrigerate for at least an hour, or up to three days. This chilling time allows the butter to firm up, which is key for the final texture.
- When you’re ready, preheat your oven to 425°F. On a floured sheet of parchment paper, roll out the chilled dough into a twelve-inch circle. Don’t worry about making it perfectly round; a rustic look adds to the charm of the galette!
- Transfer the parchment paper and dough to a rimmed baking sheet to keep everything in place while you make the filling. This will save you from the hassle of moving the assembled galette later.
- For the filling, stir together granulated sugar, all-purpose flour, and ground cinnamon in a small bowl. Slice your peaches into half-inch thick slices and toss them in a medium bowl with the flour mixture. Make sure to coat the peaches evenly.
- Add the pure vanilla extract to the peaches, mixing gently with a spatula until everything is combined. This will create the luscious filling your galette deserves.
- Now comes the fun part: assembling! Arrange the peach mixture in a circular pattern over the dough, starting from the outside and working your way in. Leave a two-inch border of dough around the edge. If any juices gather at the bottom of the bowl, discard them to prevent overflow during baking.
- Dot the top of the peach filling with small chunks of the remaining unsalted butter. Then, fold the border of the dough over the peaches, pinching together any overlapping edges. Feel free to patch up any cracks in the dough; this adds to the rustic appeal.
- For the finishing touch, brush the crust with a beaten egg and sprinkle coarse sugar on top. This will give your galette a beautiful golden color and a sweet crunch.
- Bake in your preheated oven for 25 to 30 minutes, or until the crust is golden brown and the peach juices are bubbling. It’s normal for some juices to ooze out from the bottom. Once baked, let the galette sit for about 15 minutes before serving. This will allow the juices to settle and make it easier to slice.
Things Worth Knowing
- Crust Tips: For the best flaky crust, ensure your butter is very cold and handle the dough as little as possible.
- Choosing Peaches: Use ripe but firm peaches for the best flavor and texture. Overly ripe peaches can become mushy during baking.
- Chilling Dough: Don’t skip the chilling time. It helps the gluten relax and the butter firm up, which is crucial for a tender crust.
- Baking Technique: Every oven is different. Keep an eye on your galette while it bakes to prevent over-browning.
Recipe Variations about Peach Galette
The Peach Galette is incredibly versatile, allowing you to get creative with flavors and ingredients. Here are some variations you can try!
- Mixing Fruits: Feel free to substitute or combine peaches with other fruits like nectarines, plums, or even berries for a mixed fruit galette.
- Spice It Up: Experiment with spices by adding some nutmeg or a touch of ginger to the peach mixture for a unique flavor twist.
- Using Whole Wheat Flour: For a nuttier flavor, try using whole wheat flour in place of all-purpose flour in the crust.
- Adding Nuts: Sprinkle some chopped nuts like almonds or walnuts on top of the peach filling for added crunch and flavor.
- Drizzle of Honey: For extra sweetness, drizzle some honey over the top of your galette before serving.
- Pairing with Ice Cream: Don’t forget to serve your Peach Galette with a scoop of vanilla or cinnamon ice cream for a decadent treat!
Side Dish Ideas for Peach Galette
Serving a Peach Galette opens up a world of pairing possibilities. Here are some delightful side dish ideas:
- Fresh Salad: A light mixed green salad with a tangy vinaigrette complements the sweetness of the galette beautifully.
- Cheese Board: Create a cheese board with soft cheeses like brie or goat cheese for a delightful contrast.
- Seasonal Fruits: Serve with a platter of seasonal fruits to enhance the fresh flavors of the dessert.
- Yogurt Parfait: Pair with a yogurt parfait made with layers of granola and seasonal fruit for a refreshing touch.
- Whipped Cream: A dollop of freshly whipped cream on the side elevates the dessert to a whole new level.
- Ice Cream: Vanilla or peach ice cream is a classic choice, creating a delightful contrast in temperatures.
- Breakfast Variation: Enjoy leftovers as a breakfast treat with a cup of coffee or tea.
FAQ
Conclusion
The Peach Galette is a true celebration of summer’s sweetness, combining fresh, juicy peaches with a perfectly flaky crust. It’s easy to make and sure to impress your guests, making it a must-try for any occasion. So why not gather your ingredients and give this delicious recipe a go? I promise you’ll enjoy every delightful bite!

Peach Galette
Equipment
- Mixing Bowl
- Baking Sheet
- Chef's Knife
- Wooden Spoon
- Oven
- Food Processor
Ingredients
- 1 1/3 cup All-purpose flour measured correctly by spooning and leveling
- 1 Tbsp Granulated sugar
- 1/2 tsp Fine sea salt
- 8 Tbsp Unsalted butter very cold
- 6 Tbsp Ice water or add to desired consistency
- 1 each Egg beaten for egg wash
- 1 Tbsp Coarse sugar
- 1 lb Peaches about 3-4 medium peaches or 3 cups sliced, not overly ripe
- 1/4 cup Granulated sugar
- 1 Tbsp All-purpose flour
- 1/2 tsp Ground cinnamon
- 1/2 tsp Pure vanilla extract
- 1/2 Tbsp Unsalted butter cut into small pieces
Instructions
- In a food processor with the blade attachment, pulse together the flour, sugar, and salt until combined.
- Cut cold butter into small (1/2-inch) cubes and add it to the food processor. Push the pulse button 8 to 10 times. Your butter should become pea-sized.
- Add ice water 1 Tbsp at a time and pulse between each addition. Your dough should be ready when it just begins to clump.
- Form the dough into a disk. Don’t overwork it, just pat it into a disk shape, dust with flour on all sides and cover with plastic wrap.
- Refrigerate for at least 1 hour or up to 3 days.
- Preheat the oven to 425°F. On a floured sheet of parchment paper, roll the dough into a 12″ circle with a rolling pin. It doesn't have to be a perfect circle.
- Place the parchment paper and dough into a rimmed baking sheet and refrigerate while you make the peach filling.
- In a small bowl, stir together granulated sugar, flour, and cinnamon.
- Slice peaches into 1/2″ thick slices, place peaches in a medium bowl and sprinkle with flour mixture. Add vanilla and stir gently with a spatula until the flour is fully incorporated.
- Arrange the peaches in a circular pattern over the dough working from the outside in and leaving a 2″ dough border.
- Dot the top of the peaches with small chunks of butter. Fold the border up over the peaches, pinching together the overlapping edges.
- Brush the crust with beaten egg and sprinkle with coarse sugar. Bake for 25-30 minutes until the crust is golden brown and the peach juices are syrupy.
- Let sit 15 minutes before serving.
Notes
- Storage: Store leftovers in an airtight container in the fridge for up to three days.
- Freezing: You can freeze the galette before baking. Wrap it well and store in the freezer for up to two months.
- Serving Temperature: Enjoy the galette warm, but it’s also delicious at room temperature!
- Variations: Feel free to substitute other summer fruits like berries or nectarines.
- Presentation: For an elegant touch, serve with a scoop of vanilla ice cream or a dollop of whipped cream.