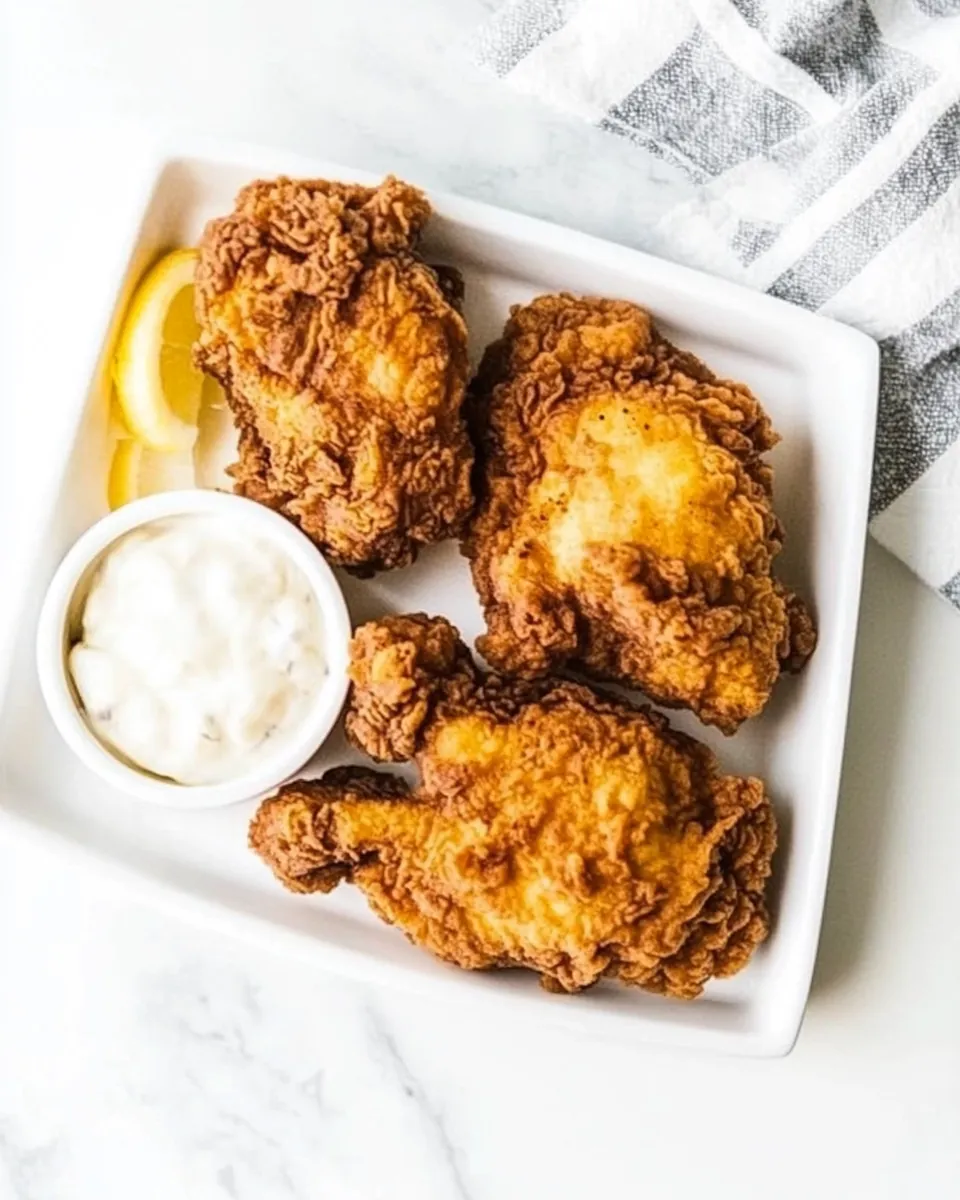
Kentucky Fried Chicken
Growing up, every family gathering felt special when my mom made her famous Kentucky Fried Chicken. The aroma wafting through the house was irresistible, pulling everyone into the kitchen with eager anticipation. It wasn’t just a meal; it was a cherished memory, filled with laughter and love. I can still hear the sizzle of the chicken frying, a sound that was music to my ears. Now, I want to share my version of this classic dish with you, a Kentucky Fried Chicken recipe that brings that same joy to your home.
Recipe Snapshot
40 mins
20 mins
20 mins
Medium
400 kcal
25 g
Paleo, Whole30, Vegan
20 g
Deep Fryer, Dutch Oven, Deep Frying Thermometer, Baking Sheet, Instant Read Meat Thermometer
Why This Kentucky Fried Chicken Is So Good
It’s a Comfort Food Staple
The first reason I love this Kentucky Fried Chicken recipe is that it’s the ultimate comfort food. Crispy on the outside and juicy on the inside, it evokes feelings of warmth and nostalgia. Whether it’s a Sunday dinner or a casual weeknight meal, this dish never fails to bring a smile to my face.
Perfectly Seasoned
Another reason this recipe stands out is the seasoning blend. Using ingredients like paprika, thyme, and ginger creates a flavor profile that’s truly irresistible. You won’t just taste the spices; you’ll experience a delightful harmony that elevates the chicken beyond ordinary fried fare.
Family-Friendly
This recipe is also incredibly family-friendly. Kids love it, and it’s a great way to introduce them to cooking. You can involve them in the breading process, making it a fun and interactive family activity. Plus, it’s a meal that everyone can agree on!
Versatile for Any Occasion
One of the best aspects of Kentucky Fried Chicken is its versatility. Whether it’s a picnic, a game day gathering, or a cozy dinner at home, this dish fits right in. You can serve it with a variety of sides, making it adaptable to different tastes and occasions.
Great for Leftovers
Lastly, I love how well it keeps. Leftover chicken can be transformed into sandwiches or salads, making your meals even more convenient. There’s something satisfying about having delicious leftovers that are just as good the next day.
Ingredients for Kentucky Fried Chicken
These ingredients come together to create a mouthwatering dish. The star of the show is, of course, the whole chicken, which gets marinated in tangy buttermilk to enhance its juiciness. The flour and spice mixture adds a crispy exterior that’s packed with flavor. Each ingredient plays a crucial role, ensuring your Kentucky Fried Chicken is unforgettable.
- Buttermilk: 1¾ cups – Key for marinating, it tenderizes the chicken and adds a rich flavor.
- Whole Chicken: 1, cut into 8 pieces – The foundation of this dish, providing juicy meat and crispy skin.
- All-Purpose Flour: 2 cups – Essential for creating that crispy coating.
- Ground Paprika: ¼ cup – Adds beautiful color and a hint of smokiness.
- Kosher Salt: 2 tablespoons – Enhances all the flavors in the dish.
- Dry Mustard: 1 tablespoon – Provides a subtle sharpness that balances the richness.
- White Pepper: 1 tablespoon – Adds a gentle heat without overpowering the other flavors.
- Ground Ginger: 2 teaspoons – Brings warmth and depth to the spice mix.
- Dried Thyme: 2 teaspoons – A classic herb that pairs beautifully with chicken.
- Dried Basil: 2 teaspoons – Contributes a sweet, aromatic flavor profile.
- Freshly Ground Black Pepper: 2 teaspoons – Adds a punchy heat that enhances the overall taste.
- Dried Oregano: 1 teaspoon – Offers a hint of earthiness.
- Celery Salt: 1 teaspoon – Adds a unique flavor that complements the chicken.
- Garlic Powder: 1 teaspoon – A must for that savory essence.
- Canola Oil: for frying – Ideal for frying due to its high smoke point.
Directions for Kentucky Fried Chicken
Making Kentucky Fried Chicken at home is easier than you might think! Follow these steps to achieve perfectly crispy and delicious chicken that rivals your favorite takeout. Let’s dive in!
Pour the buttermilk in a large bowl. Add the chicken pieces, ensuring they are fully submerged. Cover the bowl with plastic wrap and marinate for at least one hour, or up to overnight. This step is essential for tenderizing the meat and infusing it with flavor.
In a shallow dish, combine the flour, paprika, kosher salt, dry mustard, white pepper, ground ginger, dried thyme, dried basil, black pepper, dried oregano, celery salt, and garlic powder. Mix well until all the ingredients are evenly distributed.
In a deep fryer or large Dutch oven, heat about 3 to 4 inches of canola oil to 350°F. Use a deep-frying thermometer to ensure the oil is at the right temperature.
Remove one piece of chicken from the buttermilk. Let any excess liquid drip off, then dredge it in the flour mixture, pressing firmly to ensure an even coating. This is crucial for achieving that crispy crust.
Gently drop the coated chicken piece into the hot oil. Fry for 8 to 10 minutes, or until the coating is golden brown and the chicken is cooked through. You can use a meat thermometer to check that the internal temperature reaches 165°F for safety.
Once cooked, transfer the fried chicken to a plate or baking sheet lined with paper towels to absorb excess oil. This helps maintain the crispy texture.
Repeat the dredging and frying process with the remaining chicken pieces, ensuring not to overcrowd the pot. Fry in batches of about 3 to 4 pieces at a time for best results.
After all the chicken is fried, you can place it in a warm oven (about 200°F) to keep it warm and crisp while you finish the rest of the pieces.
Things Worth Knowing
- Don’t skip the marinating: Marinating the chicken in buttermilk is critical to achieving tender and flavorful meat. It also helps the coating stick better.
- Monitor your oil temperature: Use a thermometer to keep the oil at a steady 350°F. Too low will make the chicken greasy, and too high will burn the coating.
- Don’t overcrowd the fryer: Fry in small batches to maintain the oil temperature and ensure even cooking.
- Let it rest: After frying, let the chicken rest on paper towels to allow excess oil to drain and keep the crust crispy.
Ways to Customize
There are so many ways to make this Kentucky Fried Chicken your own! Here are some fun ideas to customize the dish to your taste:
- Add a Kick: Spice it up by adding cayenne pepper or hot sauce to the buttermilk marinade.
- Herb Variations: Experiment with different herbs like rosemary or oregano for a unique flavor twist.
- Gluten-Free Option: For a gluten-free version, substitute all-purpose flour with gluten-free flour.
- Cooking Methods: Try using an air fryer for a healthier version with less oil while still achieving crispiness.
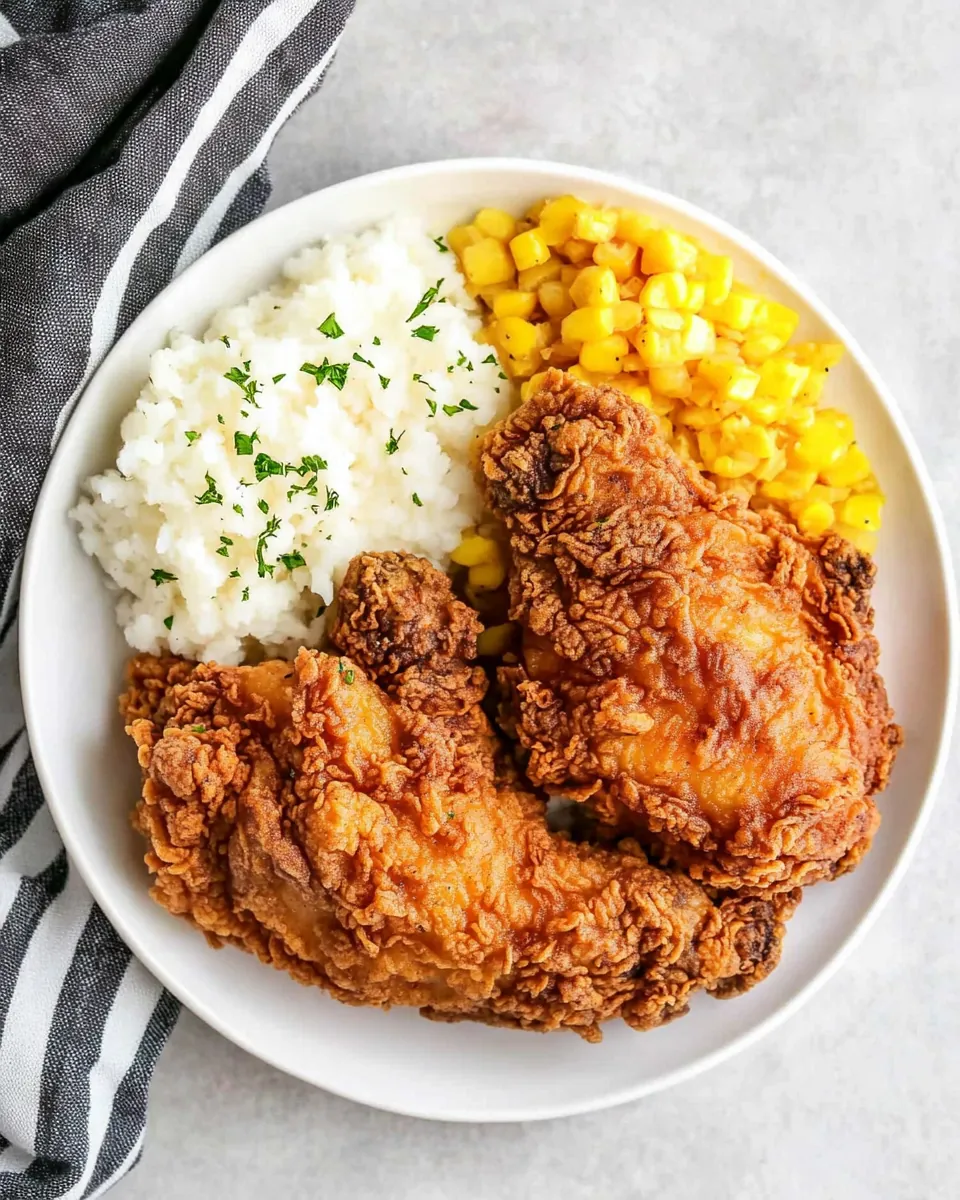
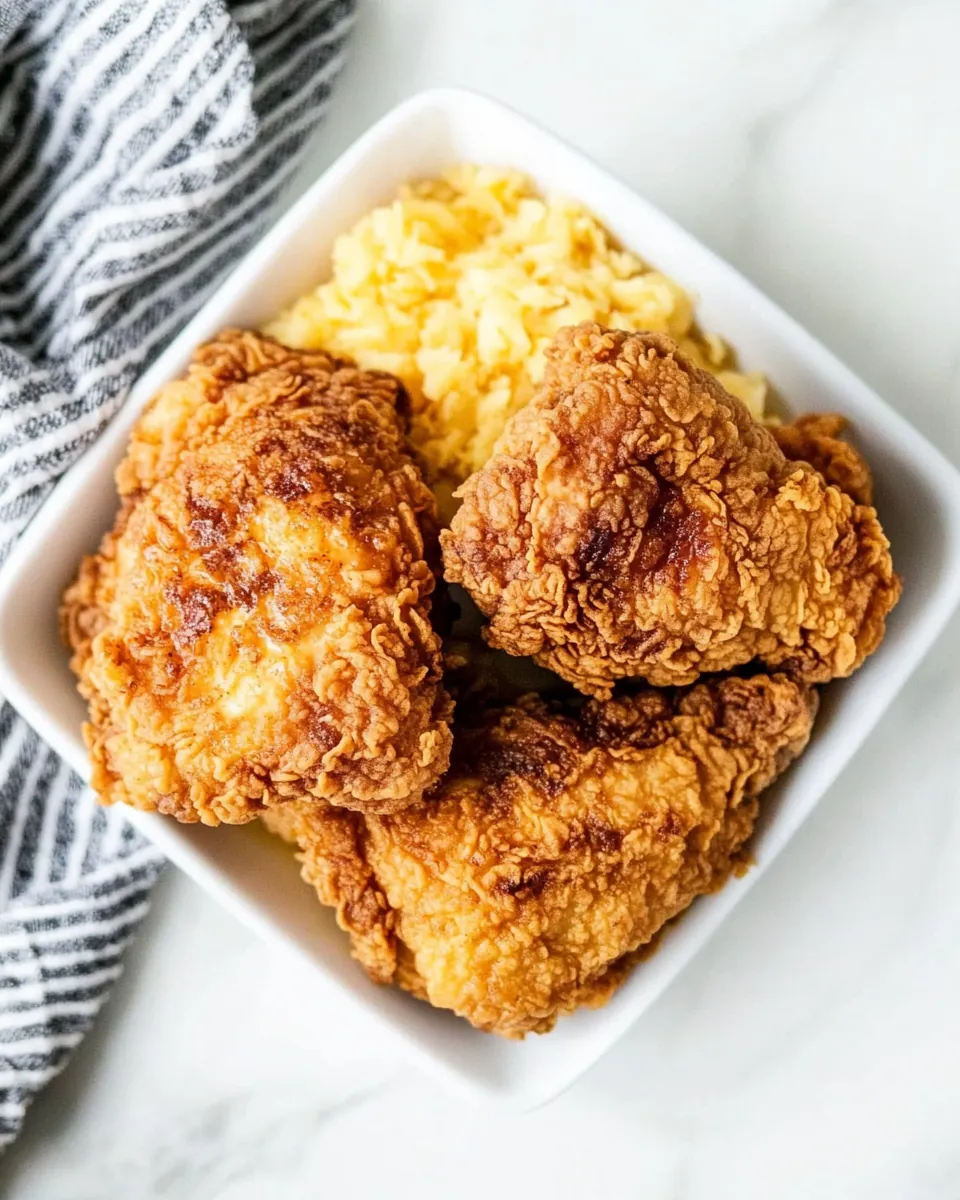
- Side Dishes: Pair your fried chicken with coleslaw, mashed potatoes, or cornbread for a complete Southern meal.
What to Pair With Kentucky Fried Chicken
Serving Kentucky Fried Chicken is as much about the sides as it is about the chicken itself. Here are some delightful pairings:
- Coleslaw: This crunchy, tangy side complements the rich flavors of the chicken and provides a refreshing contrast.
- Mashed Potatoes: Creamy, buttery mashed potatoes are a classic choice that pairs beautifully with fried chicken.
- Cornbread: Sweet cornbread adds a delightful balance to the savory chicken, making it a comfort food dream.
- Pickles: Add some dill pickles on the side for a zesty, crunchy element that brightens up the meal.
- Seasonal Vegetables: Serve with seasonal cooked vegetables or a fresh salad to lighten the meal.
- Game Days: This dish is perfect for game day gatherings, served with sides like potato wedges or chips.
- Family Gatherings: It’s ideal for family gatherings, where everyone can dig in and enjoy together.
FAQ
Conclusion
This Kentucky Fried Chicken recipe is truly special because it brings together the comfort of home cooking with unforgettable flavors. I encourage you to give it a try and create your own memories around the dinner table. Whether it’s for a family gathering or a cozy night in, this dish will surely bring joy and satisfaction to everyone who tastes it. Enjoy each bite and savor the nostalgia it brings!

Kentucky Fried Chicken
Equipment
- Deep Fryer
- Dutch Oven
- Deep-Frying Thermometer
- Baking Sheet
- instant read meat thermometer
Ingredients
- 1¾ cups Buttermilk Key for marinating, it tenderizes the chicken and adds a rich flavor.
- 1 Whole Chicken The foundation of this dish, providing juicy meat and crispy skin.
- 2 cups All-Purpose Flour Essential for creating that crispy coating.
- ¼ cup Ground Paprika Adds beautiful color and a hint of smokiness.
- 2 tablespoons Kosher Salt Enhances all the flavors in the dish.
- 1 tablespoon Dry Mustard Provides a subtle sharpness that balances the richness.
- 1 tablespoon White Pepper Adds a gentle heat without overpowering the other flavors.
- 2 teaspoons Ground Ginger Brings warmth and depth to the spice mix.
- 2 teaspoons Dried Thyme A classic herb that pairs beautifully with chicken.
- 2 teaspoons Dried Basil Contributes a sweet, aromatic flavor profile.
- 2 teaspoons Freshly Ground Black Pepper Adds a punchy heat that enhances the overall taste.
- 1 teaspoon Dried Oregano Offers a hint of earthiness.
- 1 teaspoon Celery Salt Adds a unique flavor that complements the chicken.
- 1 teaspoon Garlic Powder A must for that savory essence.
- Canola Oil Ideal for frying due to its high smoke point.
Instructions
- Pour the buttermilk in a large bowl. Add the chicken pieces, ensuring they are fully submerged. Cover the bowl with plastic wrap and marinate for at least one hour, or up to overnight. This step is essential for tenderizing the meat and infusing it with flavor.
- In a shallow dish, combine the flour, paprika, kosher salt, dry mustard, white pepper, ground ginger, dried thyme, dried basil, black pepper, dried oregano, celery salt, and garlic powder. Mix well until all the ingredients are evenly distributed.
- In a deep fryer or large Dutch oven, heat about 3 to 4 inches of canola oil to 350°F. Use a deep-frying thermometer to ensure the oil is at the right temperature.
- Remove one piece of chicken from the buttermilk. Let any excess liquid drip off, then dredge it in the flour mixture, pressing firmly to ensure an even coating. This is crucial for achieving that crispy crust.
- Gently drop the coated chicken piece into the hot oil. Fry for 8 to 10 minutes, or until the coating is golden brown and the chicken is cooked through. You can use a meat thermometer to check that the internal temperature reaches 165°F for safety.
- Once cooked, transfer the fried chicken to a plate or baking sheet lined with paper towels to absorb excess oil. This helps maintain the crispy texture.
- Repeat the dredging and frying process with the remaining chicken pieces, ensuring not to overcrowd the pot. Fry in batches of about 3 to 4 pieces at a time for best results.
- After all the chicken is fried, you can place it in a warm oven (about 200°F) to keep it warm and crisp while you finish the rest of the pieces.
Notes
- Buttermilk: If you don’t have buttermilk, you can make your own by measuring out 1¾ cups of milk, removing 1¾ tablespoons, and adding 1¾ tablespoons of white vinegar or lemon juice. Stir well and let stand for 5 minutes before using.
- Whole Chicken: I like to use a whole chicken, but you can also use your favorite parts!
- Gluten-Free: For gluten-free Kentucky Fried Chicken, swap the all-purpose flour for gluten-free 1:1 flour.
- Oil Options: You can use any neutral oil with a high smoke point, such as vegetable, peanut, or avocado.
- Drying Chicken: After marinating your chicken, pat it dry before breading it. This will help the flour stick better.
- Don’t Overcrowd: Be sure not to overcrowd the pot. Overcrowding will reduce the oil temperature, leading to oily, soggy chicken.
- Temperature Control: Always let the oil come back up to temperature before adding more chicken.
- Golden Brown: Resist the urge to turn the chicken over until you see a golden brown line all the way around the sides of the chicken. This line tells you that the breading is evenly crispy.
- Warm Oven: Place the chicken pieces in a warm oven to keep them crisp while you continue frying the rest of the chicken.