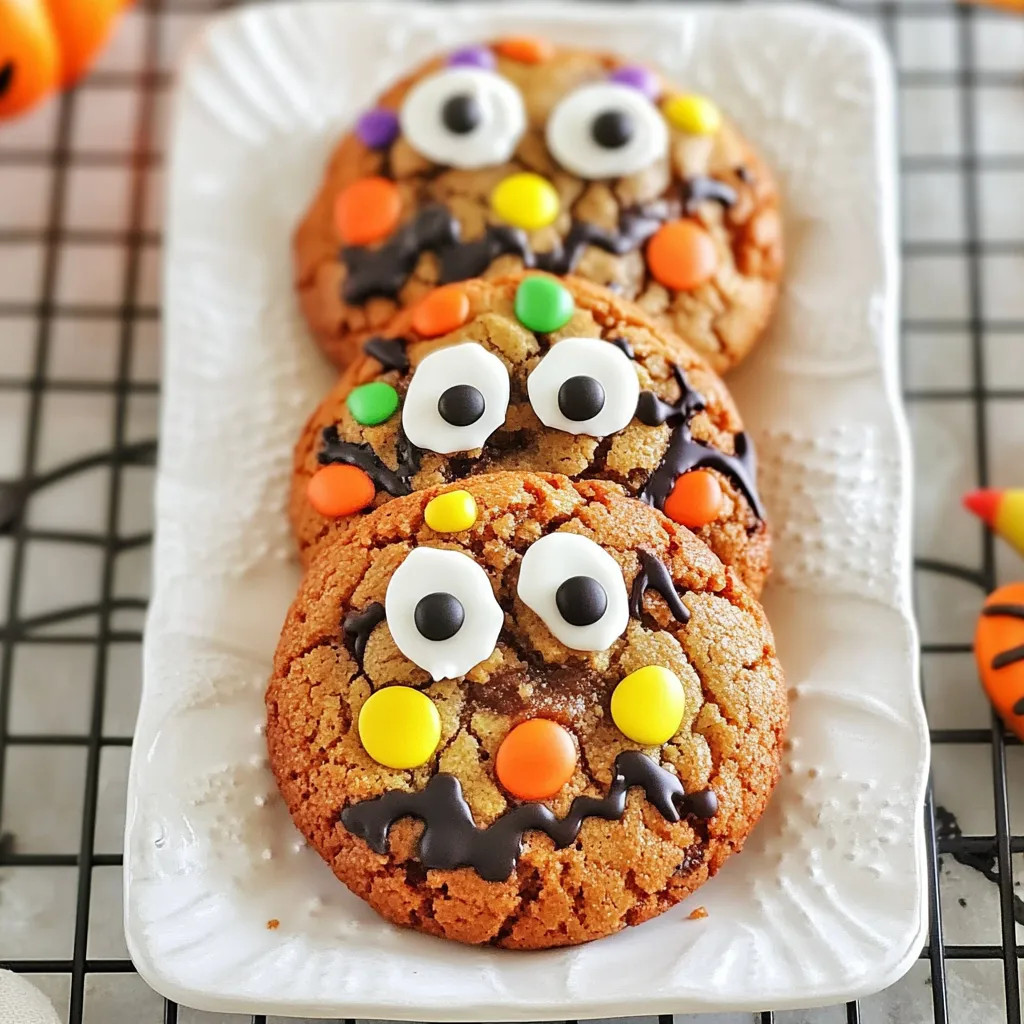
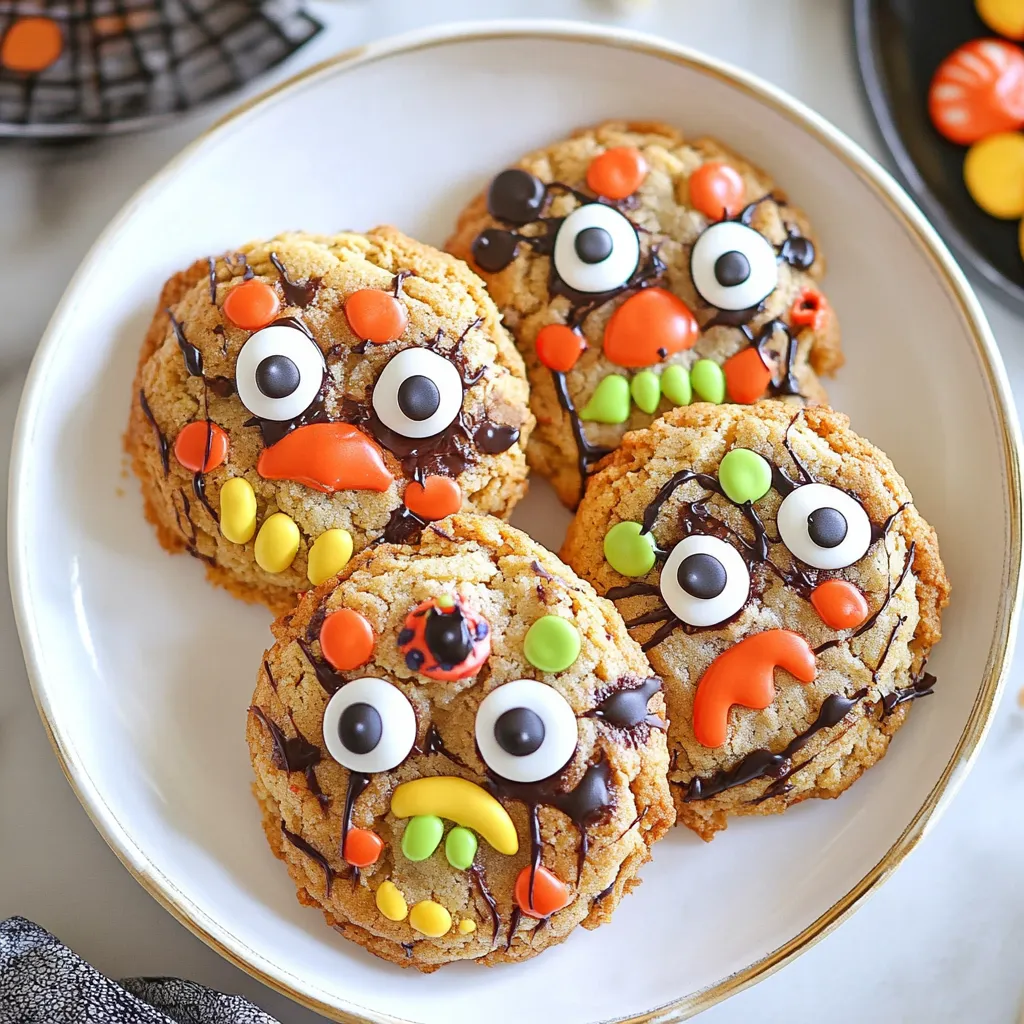
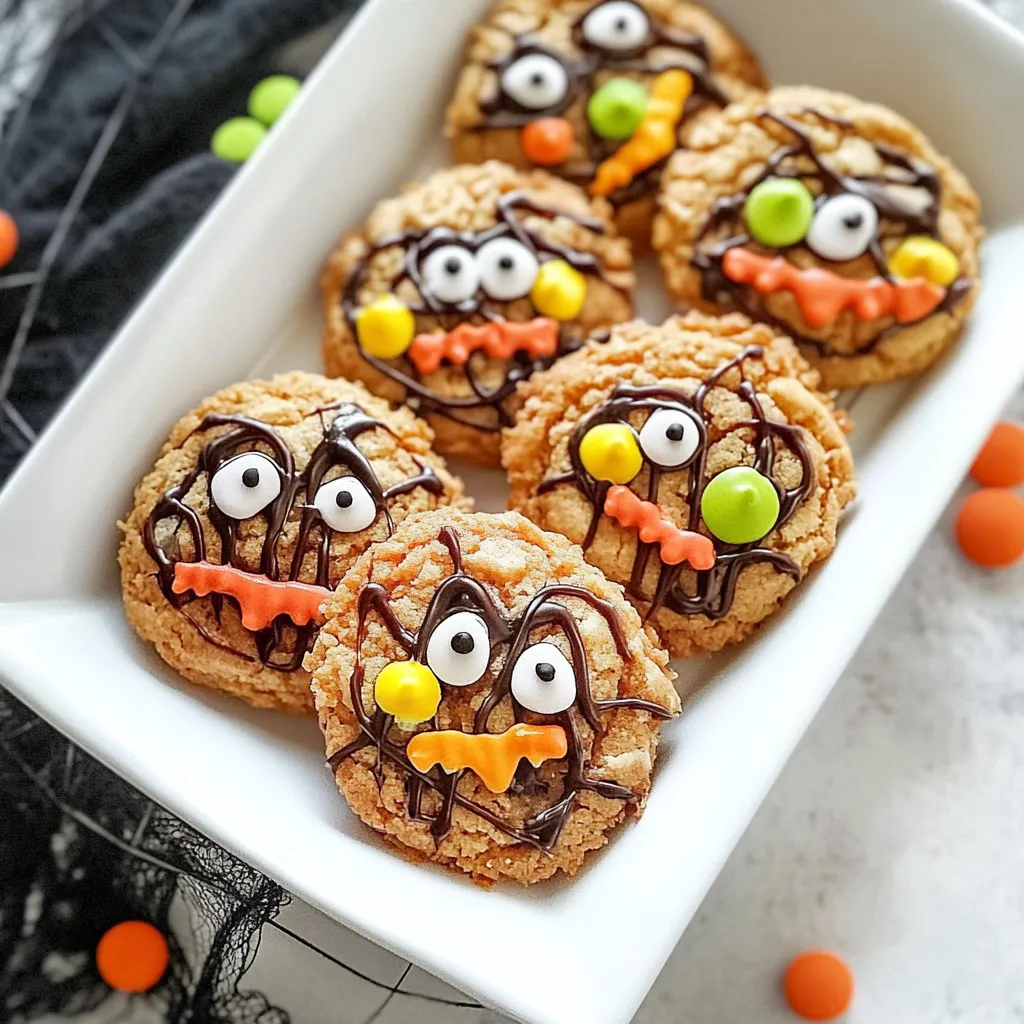
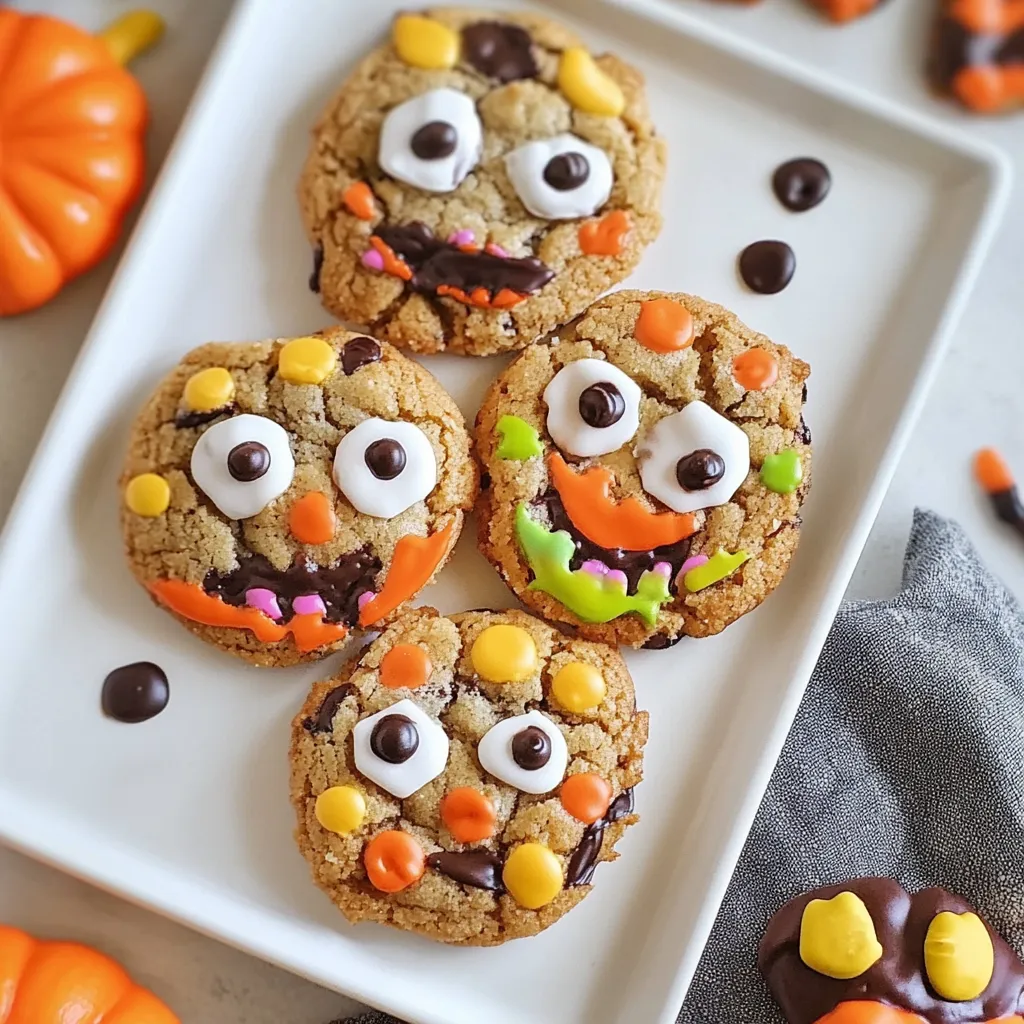
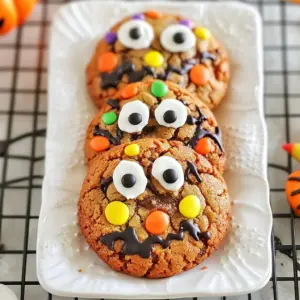
Halloween Monster Cookies
Every year, as the leaves change and the air turns crisp, I can’t help but feel that familiar excitement for Halloween. One of my favorite traditions is making Halloween Monster Cookies with my kids. We gather in the kitchen, and soon the aroma of baking cookies fills the air, mingling with laughter and chatter. These whimsical cookies, adorned with colorful candy eyes and M&M candies, are not just a treat; they become the highlight of our spooky festivities. As we shape the dough into monster forms, I reminisce about my childhood, where every Halloween was filled with creativity and deliciousness. This year, I encourage you to join in the fun and create your own batch of Halloween Monster Cookies. They’re sure to impress at any Halloween party or family gathering!
Recipe Snapshot
23 mins
15 mins
8 mins
Medium
150 kcal
2 g
Vegan, Gluten-Free, AIP
7 g
Mixing Bowl, Baking Sheet, Wooden Spoon, Whisk, Blender, Oven
Why This Halloween Monster Cookies Shines
They’re Fun and Creative
What I love most about baking Halloween Monster Cookies is how creative you can get. Each cookie can be a unique monster with its own personality, depending on how you decorate it. The kids can unleash their imagination, using a mix of candy eyeballs in different sizes and colors, transforming ordinary cookies into extraordinary creatures. Watching their faces light up as they decorate their cookies is truly priceless.
Perfect for Sharing
These cookies are perfect for sharing with friends and family. They make delightful gifts for neighbors or teachers during the Halloween season. Just imagine your loved ones’ faces lighting up as they receive a box filled with these adorable treats. It adds a personal touch to any Halloween celebration.
Easy to Make
Don’t worry if you’re not a seasoned baker. The Halloween Monster Cookies are surprisingly easy to make! With simple ingredients and straightforward instructions, even beginners can whip up a delicious batch. It’s an excellent opportunity to get the kids involved in the kitchen, teaching them basic baking skills while having fun!
Makes the House Smell Amazing
As these cookies bake, your home will fill with the irresistible smell of cookies fresh out of the oven. The combination of melted chocolate and warm dough creates a cozy atmosphere that’s perfect for fall. It’s a scent that will linger in your home, reminding everyone of the delightful treats that are about to be enjoyed.
Great for Parties
If you’re hosting a Halloween party, these cookies are a must-have! They’re eye-catching, delicious, and a great conversation starter. People will be drawn to their unique decorations and will surely want to know how you made them. Plus, they fit perfectly into a festive theme!
Customizable
One of the best things about Halloween Monster Cookies is their versatility. You can customize them to suit your taste or dietary needs. Whether you prefer different types of chocolate, nuts, or even other candies, the possibilities are endless! Create a batch that reflects your favorite flavors or try something new every year.
Ingredients You’ll Need for Halloween Monster Cookies
When it comes to baking Halloween Monster Cookies, the ingredients play a crucial role in achieving that perfect balance of flavor and texture. Each ingredient complements the others, resulting in rich, delicious cookies that are sure to please everyone. Here’s a look at what you’ll need to create these spooky treats:
- 1 cup unsalted butter, softened to room temperature – This is the base of your cookie dough, providing richness and a soft texture.
- 1 cup brown sugar, packed – Brown sugar adds moisture and a deep, caramel flavor to the cookies.
- ¾ cup granulated sugar – This helps achieve the perfect sweetness and contributes to the cookie’s chewy texture.
- 2 eggs – Eggs act as a binding agent, holding all the ingredients together.
- 2 teaspoons vanilla – A classic addition that enhances the flavor of the cookies.
- 2 ¼ cups all-purpose flour – The main dry ingredient that forms the backbone of your cookie dough.
- ¾ cup cocoa powder – This gives the cookies their rich chocolate flavor and dark color.
- 1 teaspoon baking powder – This leavening agent helps the cookies rise and become fluffy.
- ¼ teaspoon salt – Salt balances the sweetness and enhances the overall flavor.
- 1 teaspoon instant coffee granules (optional) – This can deepen the chocolate flavor without making the cookies taste like coffee.
- 1 ¼ cups Halloween M&M candies – These fun candies add color and crunch to your cookies.
- 1 cup semi-sweet chocolate chips – Chocolate chips provide additional chocolatey goodness.
- 50-60 candy eyeballs, a mixture of small, medium, and large – These will turn your cookies into spooky monsters!
How to Prepare Halloween Monster Cookies
Preparing Halloween Monster Cookies is a delightful experience, especially when you involve family or friends. The steps are straightforward, making it a perfect recipe to try together. Here’s how to bring these monster cookies to life!
- In a large bowl, combine softened butter, brown sugar, and granulated sugar together on medium speed with a hand mixer or stand mixer until the mixture is blended and fluffy. You want to cream them together until the mixture is light and airy, which should take about 2 to 3 minutes. The goal is to fully incorporate the sugars into the butter, giving your cookies their rich flavor.
- Add in eggs and vanilla to the butter-sugar mixture. Mix until everything is fully blended, which should take another minute. You’ll notice the color of the batter becomes lighter as you mix, indicating it’s well combined.
- In a separate medium bowl, whisk together flour, cocoa powder, baking powder, salt, and instant coffee granules (if using) until well blended. This step ensures that all dry ingredients are evenly distributed, which is key to achieving uniform texture and flavor in your cookies.
- Gradually add the flour mixture to the butter-sugar mixture, a little at a time, mixing on low speed until fully combined. This should take about 3 minutes. Be careful not to overmix; just mix until you see no more dry flour.
- Once combined, stir in semi-sweet chocolate chips and Halloween M&M candies with a wooden spoon until everything is evenly incorporated. This is where the fun begins! You can really see the colorful candies and chocolate chips making the dough look delicious and festive.
- Cover the bowl with plastic wrap and refrigerate the dough for 30 minutes. Chilling the dough helps solidify it, making it easier to scoop and shape the cookies later.
- While the dough chills, preheat your oven to 350 degrees Fahrenheit. This ensures that your cookies start baking at the right temperature, giving them a nice rise.
- Line a baking sheet with parchment paper. Scoop cookie dough into 1 ½ inch balls, spacing them out 1 to 2 inches apart on the baking sheet. Flatten them slightly with your fingers to even them out a bit. This will help them bake evenly and create that perfect cookie shape.
- Using a combination of small, medium, or large candy eyeballs, add them to the top of each cookie to create unique monster designs. Be creative! You can make some cookies with one eye, others with two, or even a few with extra eyes for fun!
- Bake in the preheated oven for 8 to 10 minutes, until the edges are set and the middle is soft. The cookies might not look fully done when you pull them out, but they’ll continue to cook on the baking sheet. Avoid over-baking to keep them chewy!
- Allow the cookies to cool on the baking sheet for 3 to 5 minutes before transferring them to a cooling rack. This will help them firm up and make them easier to move without breaking.
- Store any leftovers in an airtight container at room temperature for up to a week—if they last that long!
Things Worth Knowing
- Use room temperature butter: This allows for easier mixing and results in a fluffier cookie.
- Don’t skip the chilling step: Chilling the dough helps prevent the cookies from spreading too much during baking.
- Experiment with decorations: Get creative with different candies and toppings to personalize your monster cookies.
- Check for doneness: Remember, cookies will set as they cool, so take them out when they’re slightly underbaked.
Variations to Try
If you’re looking to switch things up with your Halloween Monster Cookies, here are some fun variations to consider:
- Mix in nuts: Add chopped pecans or walnuts for an extra crunch.
- Use different chocolates: Try using dark chocolate chips or white chocolate chips for a different flavor profile.
- Add spices: A pinch of cinnamon or nutmeg can add a lovely warm flavor to the cookies.
- Try different candies: Instead of M&M candies, use Reese’s Pieces or Skittles for a new twist.
- Make mini cookies: Use a smaller scoop to create mini monster cookies for bite-sized treats.
- Decorate with frosting: Instead of candy, you could use colored frosting to make fun designs.
How to Enjoy Halloween Monster Cookies
Enjoying your Halloween Monster Cookies can be as festive as the cookies themselves. Here are some ideas on how to serve and enjoy these spooky treats:
- Perfect for Halloween parties: Serve them on a decorative platter for a fun centerpiece.
- Great for school events: Pack them in lunch boxes or take them to school events to share with friends.
- Pair with milk: They make a delightful combination with a tall glass of milk, enhancing the flavor of the chocolate.
- Include in a dessert table: Set them out alongside other Halloween-themed treats like cupcakes and brownies.
- Store for later: Keep them in an airtight container to enjoy throughout the week, perfect for an after-school snack!
FAQ
Conclusion
These Halloween Monster Cookies bring both nostalgia and fun to every Halloween celebration. They’re simple to make and allow for creativity in the kitchen, making them a perfect activity for friends and family. I encourage you to try making these whimsical treats, as they’re sure to become a beloved tradition in your household!
Halloween Monster Cookies
Equipment
- Mixing Bowl
- Baking Sheet
- Wooden Spoon
- Whisk
- Blender
- Oven
Ingredients
- 1 cup unsalted butter softened to room temperature
- 1 cup brown sugar packed
- ¾ cup granulated sugar
- 2 eggs
- 2 teaspoons vanilla
- 2 ¼ cups all-purpose flour
- ¾ cup cocoa powder
- 1 teaspoon baking powder
- ¼ teaspoon salt
- 1 teaspoon instant coffee granules optional
- 1 ¼ cups Halloween M&M candies
- 1 cup semi-sweet chocolate chips
- 50-60 candy eyeballs a mixture of small, medium and large
Instructions
- In a large bowl, combine softened butter, brown sugar, and granulated sugar together on medium speed with a hand mixer or stand mixer until blended and fluffy. Add in eggs and vanilla and mix until fully blended for another minute. Set aside.
- In a medium bowl, whisk together all-purpose flour, cocoa powder, baking powder, salt, and instant coffee granules until well blended.
- Add the flour mixture to the butter-sugar mixture a little at a time and mix on low speed until fully combined, about 3 minutes. Stir in semi-sweet chocolate chips and Halloween M&M candies with a wooden spoon until evenly combined.
- Cover the bowl with plastic wrap and refrigerate it for 30 minutes.
- Preheat the oven to 350 degrees Fahrenheit. Line a baking sheet with parchment paper and scoop cookie dough into 1 ½ inch cookie balls, spacing them out 1-2 inches apart, then flatten with your fingers to even them out a bit. Add candy eyeballs to the top of the cookies using a combination of small, medium, and large eyes.
- Bake for 8-10 minutes until the edges are set and the middle is soft; they will not look done but will set once out, don’t over bake!
- Remove them from the oven and let them cool on the cookie sheet for 3-5 minutes before transferring them to a cooling rack.
- Store in an air-tight container at room temperature for up to a week, if they last that long!
Notes
- Storage: Keep cookies in an airtight container to maintain freshness for up to a week.
- Freezing: You can freeze the cookie dough before baking for up to 2 months.
- Pairing: Serve with a glass of milk for the perfect combination!
- Customization: Feel free to add different candies or chocolates to suit your taste!
- Decorating: Experiment with various decorations to make your cookies uniquely yours.