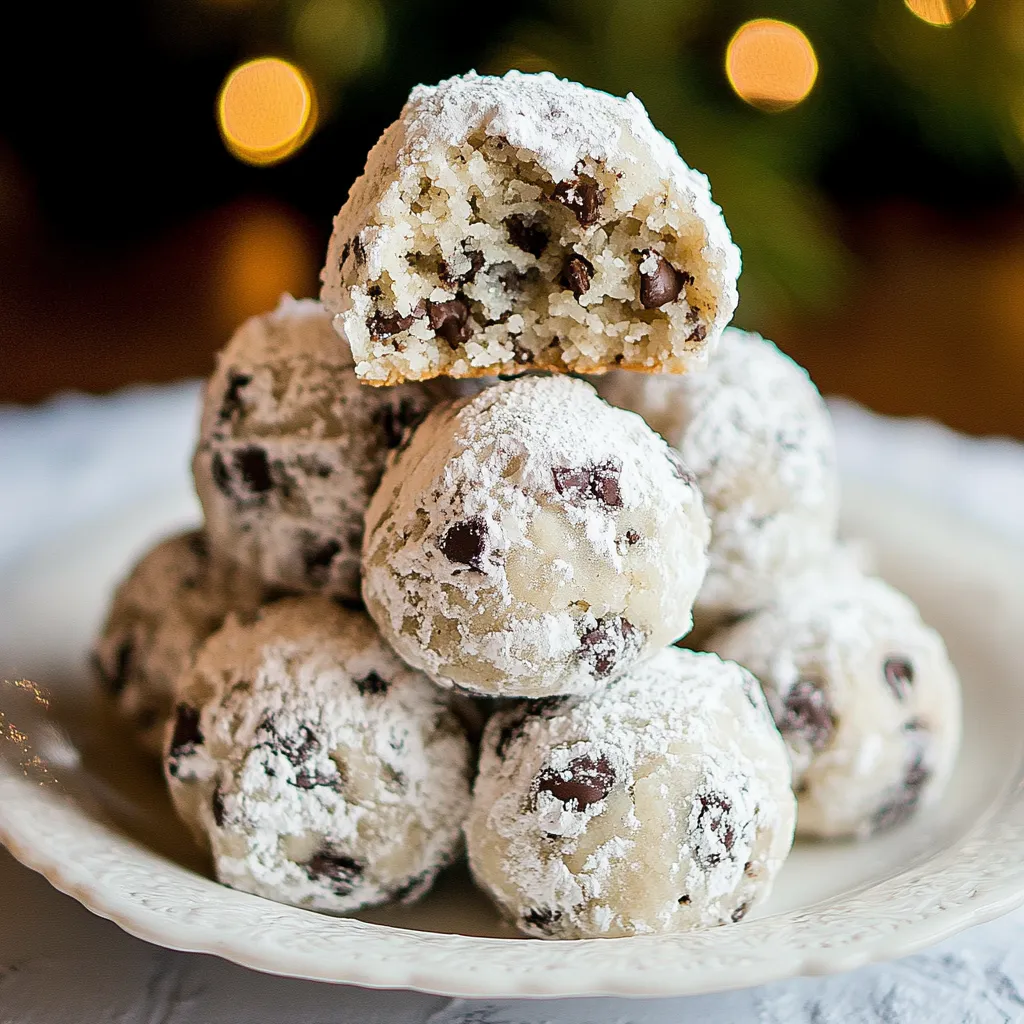
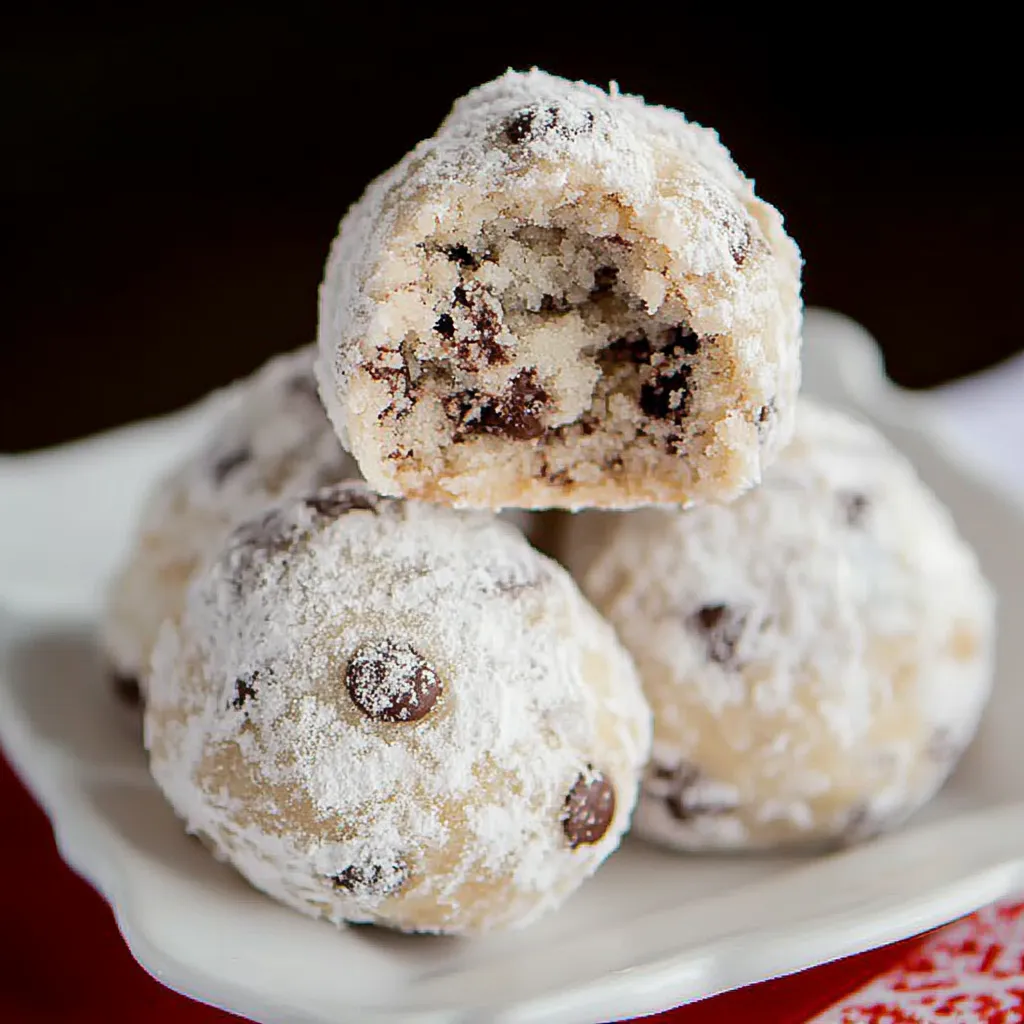
Chocolate Chip Snowball Cookies
There’s something truly magical about preparing Chocolate Chip Snowball Cookies during the winter months. As the snow gently falls outside, I find myself in the kitchen, surrounded by the warm aroma of baking cookies. This delightful recipe brings back fond memories of family gatherings, where laughter and joy filled the air, and the kitchen was always bustling with activity. The joy of rolling the cookies in powdered sugar and savoring that first bite transports me to those cherished moments. These cookies are not just treats; they are an experience, a celebration of sweetness!
Recipe Snapshot
55 mins
25 mins
30 mins
Medium
130 kcal
1 g
Gluten-Free, Low FODMAP
7 g
Mixing Bowl, Baking Sheet, Chef’s Knife, Whisk, Blender, Oven, Food Processor
Why This Chocolate Chip Snowball Cookies Stands Out
Perfectly Balanced Flavors
One of the things I adore about Chocolate Chip Snowball Cookies is how the flavors harmonize beautifully. The nuttiness of the finely ground almonds complements the sweetness of the chocolate chips, creating a delightful contrast.
Texture Sensation
Every bite of these cookies reveals a rich, crumbly texture that just melts in your mouth. The combination of butter and powdered sugar gives them that signature melt-in-your-mouth quality, making them truly irresistible.
Fun and Festive Appearance
Coated in a generous layer of powdered sugar, these cookies have a snowy appearance that makes them perfect for winter festivities. They add a festive touch to any cookie platter!
Family Favorite
Over the years, my family has fallen in love with this recipe. It’s become a tradition to bake these cookies every winter, and I love watching everyone’s faces light up with happiness as they take their first bite.
Versatility
These cookies are not just for the holidays; they can be enjoyed anytime! Whether you’re hosting a gathering or just indulging in a sweet treat on a cozy evening, they fit perfectly into any occasion.
Easy to Make
Despite their fancy appearance, making Chocolate Chip Snowball Cookies is surprisingly simple. With just a few easy steps, you can whip up a batch of these delightful cookies in no time.
What Goes Into Chocolate Chip Snowball Cookies

When it comes to the ingredients for Chocolate Chip Snowball Cookies, simplicity is key. Each component plays a vital role in achieving that perfect balance of flavor and texture. The star players here are the almonds, which add a delightful nuttiness, and the butter, which ensures that every bite just melts in your mouth.
- Sliced Almonds: 3/4 cup of finely ground sliced almonds brings a nutty flavor and a wonderful texture. They’re the perfect complement to the sweet chocolate.
- All-Purpose Flour: 2 cups of all-purpose flour serves as the base for these cookies, giving them structure and stability.
- Salt: 1/4 + 1/8 tsp of salt enhances the flavors, making everything pop and taste even better.
- Unsalted Butter: 1 cup of unsalted butter, softened to the right texture, is essential for giving the cookies that rich, buttery flavor.
- Powdered Sugar: 1 1/2 cups of powdered sugar adds sweetness and is also used for rolling the cookies post-baking.
- Vanilla Extract: 1 1/2 tsp of vanilla extract adds depth and warmth to the flavor profile.
- Mini Chocolate Chips: 1 cup of mini chocolate chips brings bursts of sweetness in every bite, making these cookies even more indulgent.
Putting Together Chocolate Chip Snowball Cookies
Getting started on these Chocolate Chip Snowball Cookies is always a joy. The combination of chopping, mixing, and rolling brings back fond memories. Let’s dive into how to create these delightful treats!
Preheat your oven to 375 degrees Fahrenheit. This step is crucial as it ensures your cookies bake evenly and achieve that perfect golden bottom.
In a food processor, grind the sliced almonds into tiny bits. You want them finely ground but not turned into almond butter. Set aside once done.
In a mixing bowl, whisk together the all-purpose flour and salt. This mixture will provide the structure for the cookies, so ensure it’s well combined.
In the bowl of an electric stand mixer fitted with the paddle attachment, cream the butter with 1/2 cup of powdered sugar until they are blended, creamy, and slightly fluffy. It won’t be pale, but it should hold together nicely.
Mix in the vanilla extract until evenly distributed. The aroma will be heavenly at this point!
With the mixer set to low speed, gradually add in the flour and salt mixture. Mix just until combined, being careful not to overmix.
Add the mini chocolate chips and ground almonds to the dough. Gently fold them in with a spatula to ensure they are evenly distributed.
Scoop out 1 tablespoon of dough and roll it into a ball. This part is so much fun! Place the dough balls onto an ungreased cookie sheet, spacing them evenly apart. About 16 per sheet works well.
Bake in the preheated oven for 10 to 12 minutes. You’ll know they’re done when the bottoms are lightly golden brown. Keep an eye on them, as every oven behaves differently!
Once baked, let them cool for a few minutes until they’re cool enough to handle. Prepare a small mixing bowl with the remaining powdered sugar.
Dip and roll each cookie in the powdered sugar for a light coating. Transfer to a wire rack to cool completely. Repeat with the remaining dough.
For an extra touch, once they’re cool, roll the cookies again in powdered sugar for a thicker coating. Store these delicious cookies in an airtight container and enjoy!
Things Worth Knowing
- Temperature Matters: Make sure your butter is softened enough to create a nice creamy mixture but not too soft to avoid spreading during baking.
- Almonds: Finely ground almonds add flavor and texture. Don’t grind them too finely or they’ll turn into almond butter!
- Cookie Sheet Choice: I recommend avoiding dark non-stick cookie sheets as they can brown the cookies too much on the bottom.
- Cooling Time: Allow your cookies to cool on a wire rack to prevent them from becoming soggy.
Tips and Tricks about Chocolate Chip Snowball Cookies
These tips will enhance your baking experience and ensure your Chocolate Chip Snowball Cookies turn out perfectly every time!
- Storage: Store your cookies in an airtight container at room temperature for up to one week to keep them fresh.
- Freezing: You can freeze cookie dough balls before baking. Just roll them in powdered sugar after baking and allow to cool.
- Variations: Feel free to experiment with different nuts or add a hint of citrus zest for a unique twist.
- Batch Cooking: Consider doubling or tripling the recipe for holiday gatherings or to gift to friends and family.
- Serving Size: These cookies are great for parties, so consider serving them on a festive plate to impress your guests!
Great Combinations for Chocolate Chip Snowball Cookies
These Chocolate Chip Snowball Cookies are ideal for various occasions and pair wonderfully with different treats. Here are some delightful combinations:
- Hot Beverages: Pair your cookies with steaming cups of coffee, hot chocolate, or spiced tea for a cozy treat.
- Holiday Platters: Include these cookies on your holiday cookie platters alongside other festive sweets such as gingerbread or peppermint bark.
- Family Gatherings: Bring these cookies to family gatherings or potlucks; they’re sure to be a hit with both kids and adults.
- Lunch Boxes: Perfect for lunch boxes, these cookies make for a sweet surprise that kids will love.
- Seasonal Treats: Serve these cookies during winter celebrations, such as Christmas and New Year’s Eve.
FAQ
Conclusion
In summary, Chocolate Chip Snowball Cookies are a delightful treat that perfectly captures the essence of winter baking. Their rich flavors, unique texture, and beautiful presentation make them a favorite among family and friends. I encourage you to try this recipe and bring a bit of holiday cheer into your kitchen. You won’t be disappointed, and I can guarantee they will become a cherished tradition in your home.

Chocolate Chip Snowball Cookies
Equipment
- Mixing Bowl
- Baking Sheet
- Chef's Knife
- Whisk
- Blender
- Oven
- Food Processor
Ingredients
- 3/4 cup Sliced Almonds
- 2 cups All-Purpose Flour scoop and level to measure
- 1/4 + 1/8 tsp Salt
- 1 cup Unsalted Butter halfway softened
- 1 1/2 cups Powdered Sugar divided
- 1 1/2 tsp Vanilla Extract
- 1 cup Mini Chocolate Chips
Instructions
- Preheat your oven to 375 degrees Fahrenheit. This step is crucial as it ensures your cookies bake evenly and achieve that perfect golden bottom.
- In a food processor, grind the sliced almonds into tiny bits. You want them finely ground but not turned into almond butter. Set aside once done.
- In a mixing bowl, whisk together the all-purpose flour and salt. This mixture will provide the structure for the cookies, so ensure it's well combined.
- In the bowl of an electric stand mixer fitted with the paddle attachment, cream the butter with 1/2 cup of powdered sugar until they are blended, creamy, and slightly fluffy. It won’t be pale, but it should hold together nicely.
- Mix in the vanilla extract until evenly distributed. The aroma will be heavenly at this point!
- With the mixer set to low speed, gradually add in the flour and salt mixture. Mix just until combined, being careful not to overmix.
- Add the mini chocolate chips and ground almonds to the dough. Gently fold them in with a spatula to ensure they are evenly distributed.
- Scoop out 1 tablespoon of dough and roll it into a ball. This part is so much fun! Place the dough balls onto an ungreased cookie sheet, spacing them evenly apart. About 16 per sheet works well.
- Bake in the preheated oven for 10 to 12 minutes. You’ll know they’re done when the bottoms are lightly golden brown. Keep an eye on them, as every oven behaves differently!
- Once baked, let them cool for a few minutes until they’re cool enough to handle. Prepare a small mixing bowl with the remaining powdered sugar.
- Dip and roll each cookie in the powdered sugar for a light coating. Transfer to a wire rack to cool completely. Repeat with the remaining dough.
- For an extra touch, once they’re cool, roll the cookies again in powdered sugar for a thicker coating. Store these delicious cookies in an airtight container and enjoy!
Notes
- Tip 1: I recommend softening the butter about halfway just so the cookies don't spread very much while baking.
- Tip 2: I don't recommend dark non-stick cookie sheets for this recipe, they always brown cookies too much on the bottom.