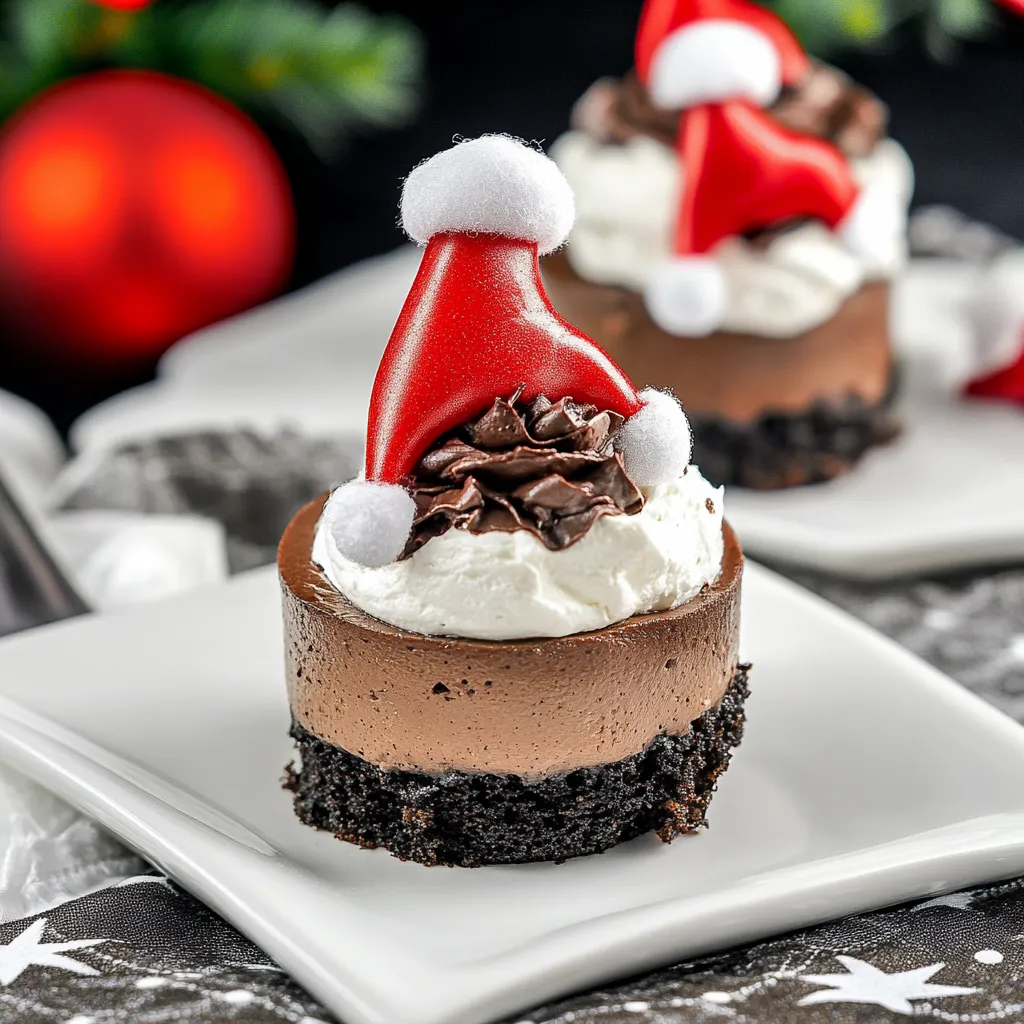
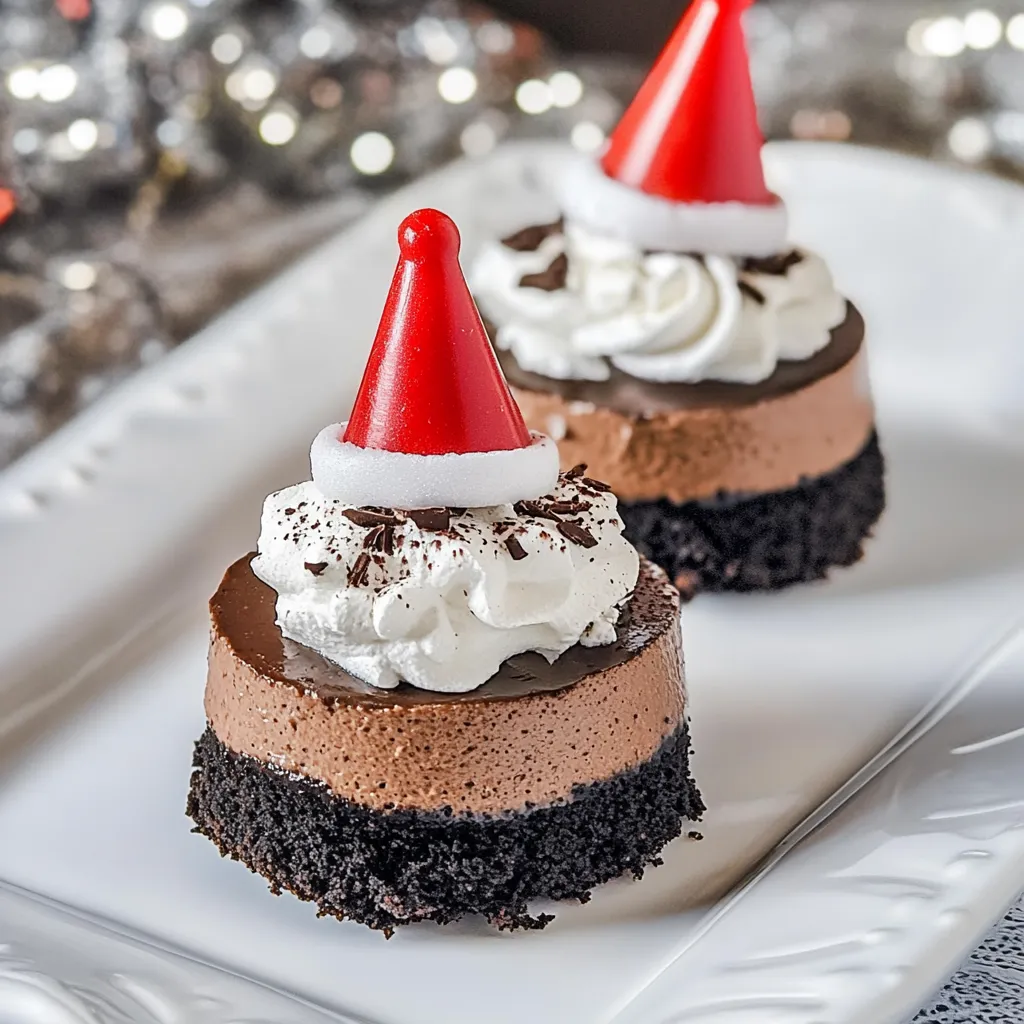
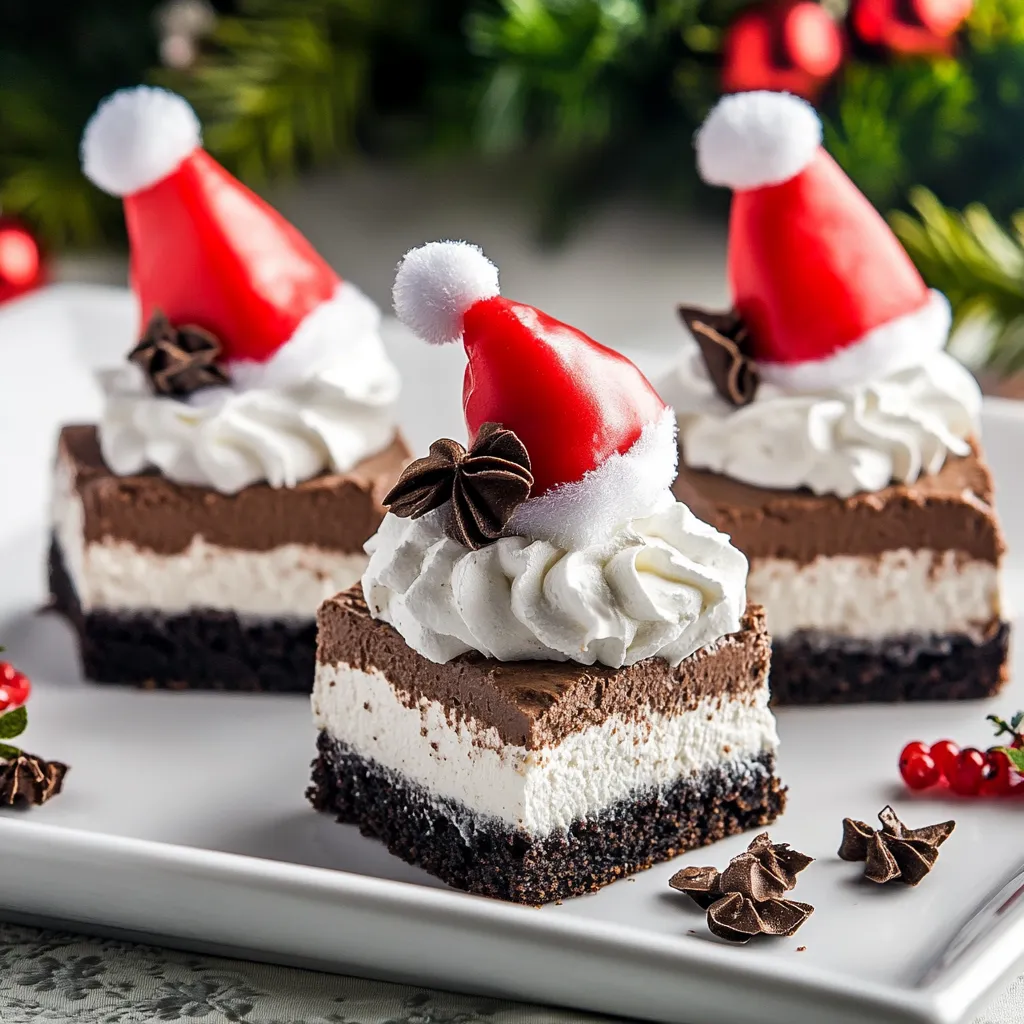
Chocolate Cheesecake Santa Hats
The Chocolate Cheesecake Santa Hats have become a beloved treat in my household during the holiday season. Each December, as the festive spirit fills the air, my kids and I gather in the kitchen to create these delightful desserts. The anticipation builds as we blend the creamy cheesecake filling with crushed Oreo cookies and melt the bittersweet chocolate. These little treats are not just delicious; they’re a chance for us to bond and create lasting memories. As we shape each cheesecake into a hat and top it with a bright red strawberry, the excitement is palpable. The smiles on my children’s faces when they see the finished product are priceless. I love how the Chocolate Cheesecake Santa Hats not only taste amazing but also bring us together, making our holiday celebrations extra special.
Recipe Snapshot
55 mins
30 mins
25 mins
Medium
290 kcal
4 g
Gluten-Free, Low FODMAP
15 g
Mini Cheesecake Pan, Glass Mixing Bowl Set (3 piece), KitchenAid Hand Mixer
What’s Great About This Chocolate Cheesecake Santa Hats
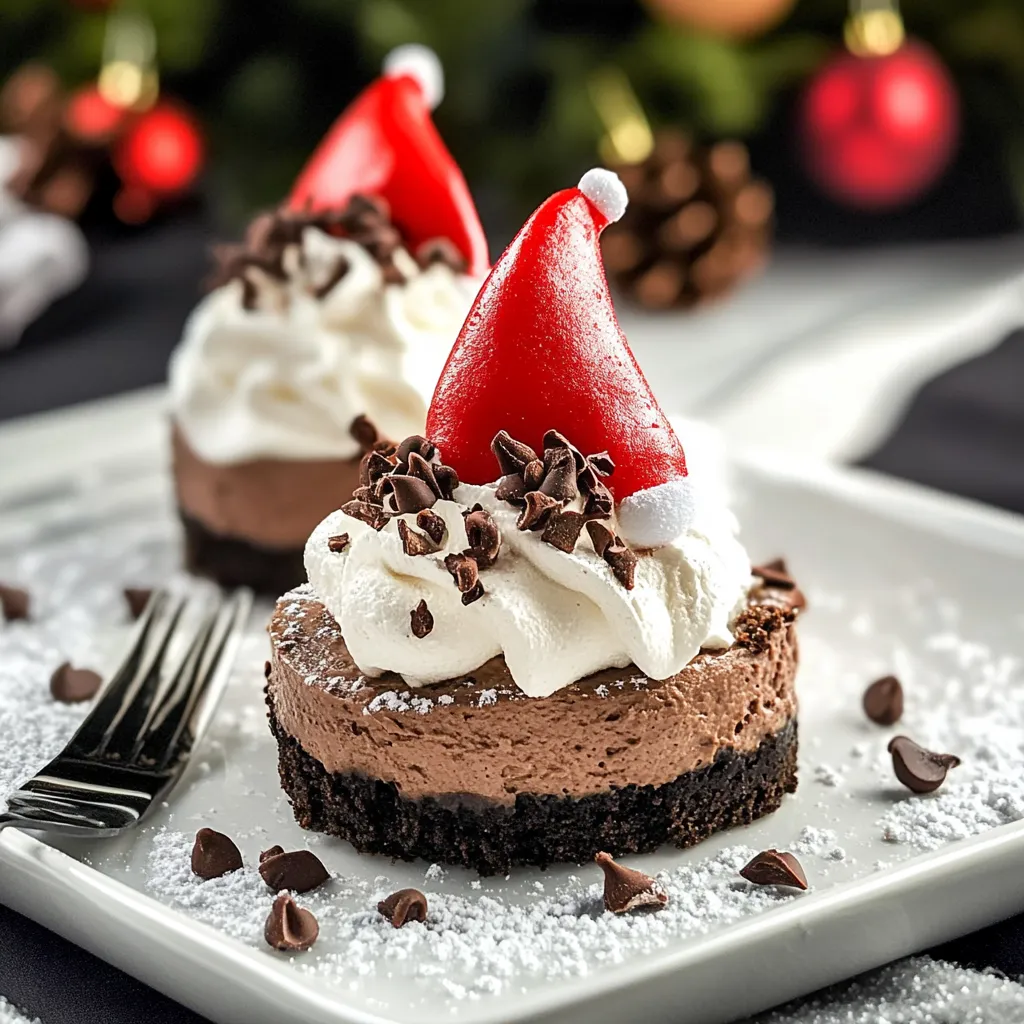
They’re Simply Adorable
The Chocolate Cheesecake Santa Hats are a feast for the eyes. Shaped like Santa’s hat and decorated with vibrant strawberries and whipped cream, they are the perfect centerpiece for any holiday dessert table. I love how their whimsical appearance brings a fun and festive touch to my gatherings, making them a hit among both kids and adults.
Irresistibly Creamy
One bite into these cheesecakes and you’ll savor the rich, creamy texture that just melts in your mouth. The combination of cream cheese, sugar, and melted chocolate provides a luscious experience that is simply unforgettable. I find that this creamy filling balances beautifully with the crunch of the Oreo crust, making each bite a delightful contrast.
Easy to Make
Despite their stunning appearance, these cheesecakes are surprisingly easy to prepare. You don’t need to be a master baker to whip them up. The process is straightforward, and I appreciate that it allows me to involve my children in the kitchen. They love mixing the ingredients and creating their edible masterpieces!
Perfect for Any Occasion
While the Chocolate Cheesecake Santa Hats are perfect for Christmas, they can be enjoyed during any celebration. Whether it’s a birthday party, a festive gathering, or just a casual family dessert night, these cheesecakes add a touch of cheer to any event. Their charm and deliciousness make them versatile for all occasions.
Make Ahead of Time
One of the best things about these cheesecakes is that they can be prepared ahead of time. I often make them a day or two in advance, allowing the flavors to meld beautifully while they chill in the refrigerator. This makes hosting a breeze and lets me enjoy the festivities without stress.
Great for Sharing
With 12 servings, the Chocolate Cheesecake Santa Hats are perfect for sharing with family and friends. I love bringing them to gatherings, and they always receive rave reviews. Watching everyone enjoy these little treats brings me so much joy, and I can’t help but feel proud of the deliciousness we created together.
Essential Ingredients for Chocolate Cheesecake Santa Hats
The beauty of the Chocolate Cheesecake Santa Hats lies in their simple yet flavorful ingredients. Each component plays a crucial role in achieving that perfect balance of taste and texture. The key players include the classic Oreo cookies for the crust, which provide a rich chocolatey base, while the cream cheese gives the filling its signature creaminess. Add in some bittersweet chocolate and fresh strawberries for decoration, and you have a delightful treat that’s sure to impress.
- 1 cup Oreo cookies (crushed) – These cookies form the foundation of the cheesecake crust, adding a delicious chocolate flavor with a crispy texture.
- 2 tablespoons butter (unsalted, melted) – Melted butter binds the crushed cookies together, creating a sturdy crust that holds its shape.
- 16 ounces cream cheese (at room temperature) – The star of the filling, cream cheese provides a rich and creamy base that’s essential for cheesecakes.
- ⅔ cup brown sugar (packed) – This adds a hint of caramel sweetness, balancing the richness of the cream cheese.
- 2 eggs (at room temperature) – Eggs help to set the cheesecake structure while adding a touch of richness.
- ¼ cup sour cream – Adds a subtle tanginess that brightens the overall flavor of the cheesecake.
- 1½ teaspoons instant coffee (dissolved in 2 tsp water) – Enhances the chocolate flavor and adds depth to the filling.
- ¼ teaspoon salt (fine grain) – Just a pinch to balance the sweetness and enhance the flavors.
- 1 teaspoon vanilla extract – Provides a warm, fragrant sweetness that complements the chocolate beautifully.
- 2 tablespoons cocoa powder (unsweetened) – Intensifies the chocolate flavor in the filling, making it rich and indulgent.
- 6 ounces bittersweet chocolate (melted and cooled to just warm) – Adds richness and depth to the cheesecake filling.
- 1 cup cool whip (or whipped cream) – For topping, this lightens the overall dessert and adds a touch of sweetness.
- 12 strawberries – Fresh strawberries make for the perfect decorative and delicious topping, resembling Santa’s hat.
Chocolate Cheesecake Santa Hats Instructions
Getting started on the Chocolate Cheesecake Santa Hats is half the fun! Follow these steps carefully, and your cheesecakes will turn out perfectly every time. The process is straightforward, so roll up your sleeves and let’s dive in!
- Preheat your oven to 350℉. This initial step ensures that your cheesecakes bake evenly, so don’t skip it!
- In a mixing bowl, combine the crushed Oreo cookies with the melted butter. Stir until the crumbs are well coated and resemble wet sand.
- Divide the cookie mixture evenly into each cup of your mini cheesecake pan, using your fingers or a small spoon to press it down firmly. This helps form a solid base for your cheesecakes.
- Bake the crusts for about 7 minutes until they’re firm and slightly set. Keep an eye on them to ensure they don’t burn.
- Once baked, reduce the oven temperature to 300℉. This lower temperature is crucial for baking the cheesecakes without cracking.
- In a large mixing bowl, add the room-temperature cream cheese and brown sugar. Mix with a hand mixer for about 3 minutes until smooth and fluffy.
- Add the eggs one at a time, mixing gently after each addition. You want to incorporate them fully without overmixing, which can lead to cracks.
- Next, add the sour cream, instant coffee, salt, vanilla extract, cocoa powder, and melted chocolate. Blend until just combined, looking for a smooth consistency.
- Spoon the cheesecake batter into each cup, filling them to the top. If there’s any leftover batter, use small ramekins to bake extra treats!
- Bake for 15 to 18 minutes. The cheesecakes should be set but still slightly jiggly in the center.
- Remove the pan from the oven and let the cheesecakes cool completely before taking them out. Once cooled, refrigerate for a couple of hours so they can set properly.
- Before serving, top each cheesecake with cool whip using a piping bag for a nice presentation. Place a fresh strawberry on top, and pipe a bit more cool whip onto the strawberry. This adds that final festive touch!
- Refrigerate until you’re ready to serve them. Enjoy!
Things Worth Knowing
- Don’t overmix: Be careful not to overmix the cheesecake batter after adding the eggs; this prevents cracks.
- Room temperature ingredients: Ensure that your cream cheese and eggs are at room temperature for a smoother mix.
- Cooling time: Allow the cheesecakes to cool completely before refrigerating, as this helps them set properly.
- Use a timer: Keep an eye on baking times to avoid overbaking, which can dry out the cheesecakes.
Tips and Variations
The Chocolate Cheesecake Santa Hats are fantastic as is, but there are many ways to add your personal touch. Here are some tips and variations to consider:
- Storage: Keep leftovers in an airtight container in the refrigerator for up to 3 days to maintain their freshness.
- Freezing: Allow the cheesecakes to cool completely before placing them in the freezer. Wrap them tightly in plastic wrap and aluminum foil to prevent freezer burn; they can last up to 3 months.
- Pairing: Serve these cheesecakes with a warm chocolate sauce for an extra indulgent treat.
- Decoration: Experiment with other fruits like raspberries or blueberries for different flavors and presentations.
- Flavor variations: Try adding a bit of peppermint extract to the filling for a festive twist!
- Serving suggestions: These cheesecakes are perfect for holiday parties, potlucks, or simply as a sweet treat after dinner.
Perfect Matches for Chocolate Cheesecake Santa Hats
When it comes to serving the Chocolate Cheesecake Santa Hats, there are several delightful pairings and occasions to consider:
- Holiday Gatherings: These cheesecakes make a cheerful addition to your holiday dessert table, bringing smiles and sweetness.
- Ice Cream: Serve alongside a scoop of vanilla or chocolate ice cream for an indulgent dessert experience.
- Festive Drinks: Pair with hot cocoa, eggnog, or a festive punch for a complete holiday treat.
- Dinner Parties: Impress your guests at dinner parties with these beautiful desserts, perfect for ending a meal on a sweet note.
- Gift Giving: Package a few in decorative boxes as sweet gifts for friends and family during the holiday season.
- Seasonal Occasions: These cheesecakes aren’t just for Christmas; they can brighten up any winter gathering!
FAQ
Conclusion
The Chocolate Cheesecake Santa Hats are not only a delightful dessert but also a way to create cherished memories with loved ones during the holiday season. Their rich flavors and adorable presentation make them a must-try for anyone looking to indulge in something special. So why not gather your family, head to the kitchen, and whip up these festive treats? I promise they’ll be the highlight of your gathering!

Chocolate Cheesecake Santa Hats
Equipment
- Mini Cheesecake Pan
- Glass Mixing Bowl Set (3 piece)
- KitchenAid Hand Mixer
Ingredients
- 1 cup Oreo cookies crushed
- 2 tablespoons butter unsalted, melted
- 16 ounces cream cheese at room temperature
- ⅔ cup brown sugar packed
- 2 eggs eggs at room temperature
- ¼ cup sour cream
- 1½ teaspoons instant coffee dissolved in 2 tsp water
- ¼ teaspoon salt fine grain
- 1 teaspoon vanilla extract
- 2 tablespoons cocoa powder unsweetened
- 6 ounces bittersweet chocolate melted and cooled to just warm
- 1 cup cool whip or whipped cream
- 12 strawberries
Instructions
- Preheat your oven to 350℉. This initial step ensures that your cheesecakes bake evenly, so don’t skip it!
- In a mixing bowl, combine the crushed Oreo cookies with the melted butter. Stir until the crumbs are well coated and resemble wet sand.
- Divide the cookie mixture evenly into each cup of your mini cheesecake pan, using your fingers or a small spoon to press it down firmly. This helps form a solid base for your cheesecakes.
- Bake the crusts for about 7 minutes until they're firm and slightly set. Keep an eye on them to ensure they don’t burn.
- Once baked, reduce the oven temperature to 300℉. This lower temperature is crucial for baking the cheesecakes without cracking.
- In a large mixing bowl, add the room-temperature cream cheese and brown sugar. Mix with a hand mixer for about 3 minutes until smooth and fluffy.
- Add the eggs one at a time, mixing gently after each addition. You want to incorporate them fully without overmixing, which can lead to cracks.
- Next, add the sour cream, instant coffee, salt, vanilla extract, cocoa powder, and melted chocolate. Blend until just combined, looking for a smooth consistency.
- Spoon the cheesecake batter into each cup, filling them to the top. If there’s any leftover batter, use small ramekins to bake extra treats!
- Bake for 15 to 18 minutes. The cheesecakes should be set but still slightly jiggly in the center.
- Remove the pan from the oven and let the cheesecakes cool completely before taking them out. Once cooled, refrigerate for a couple of hours so they can set properly.
- Before serving, top each cheesecake with cool whip using a piping bag for a nice presentation. Place a fresh strawberry on top, and pipe a bit more cool whip onto the strawberry. This adds that final festive touch!
- Refrigerate until you’re ready to serve them. Enjoy!
Notes
- Storage: Keep leftovers in an airtight container in the refrigerator for up to 3 days to maintain their freshness.
- Freezing: Allow the cheesecakes to cool completely before placing them in the freezer. Wrap them tightly in plastic wrap and aluminum foil to prevent freezer burn; they can last up to 3 months.
- Pairing: Serve these cheesecakes with a warm chocolate sauce for an extra indulgent treat.
- Decoration: Experiment with other fruits like raspberries or blueberries for different flavors and presentations.
- Flavor variations: Try adding a bit of peppermint extract to the filling for a festive twist!
- Serving suggestions: These cheesecakes are perfect for holiday parties, potlucks, or simply as a sweet treat after dinner.