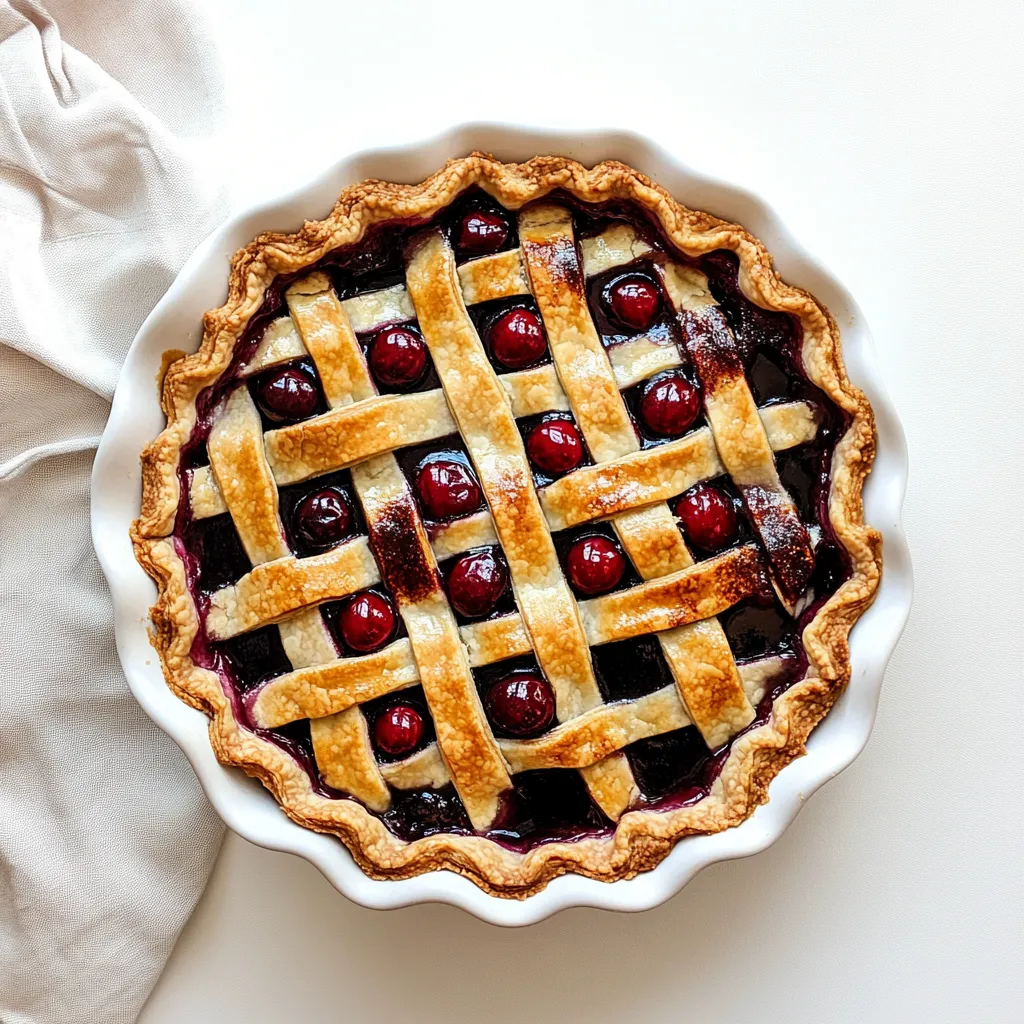
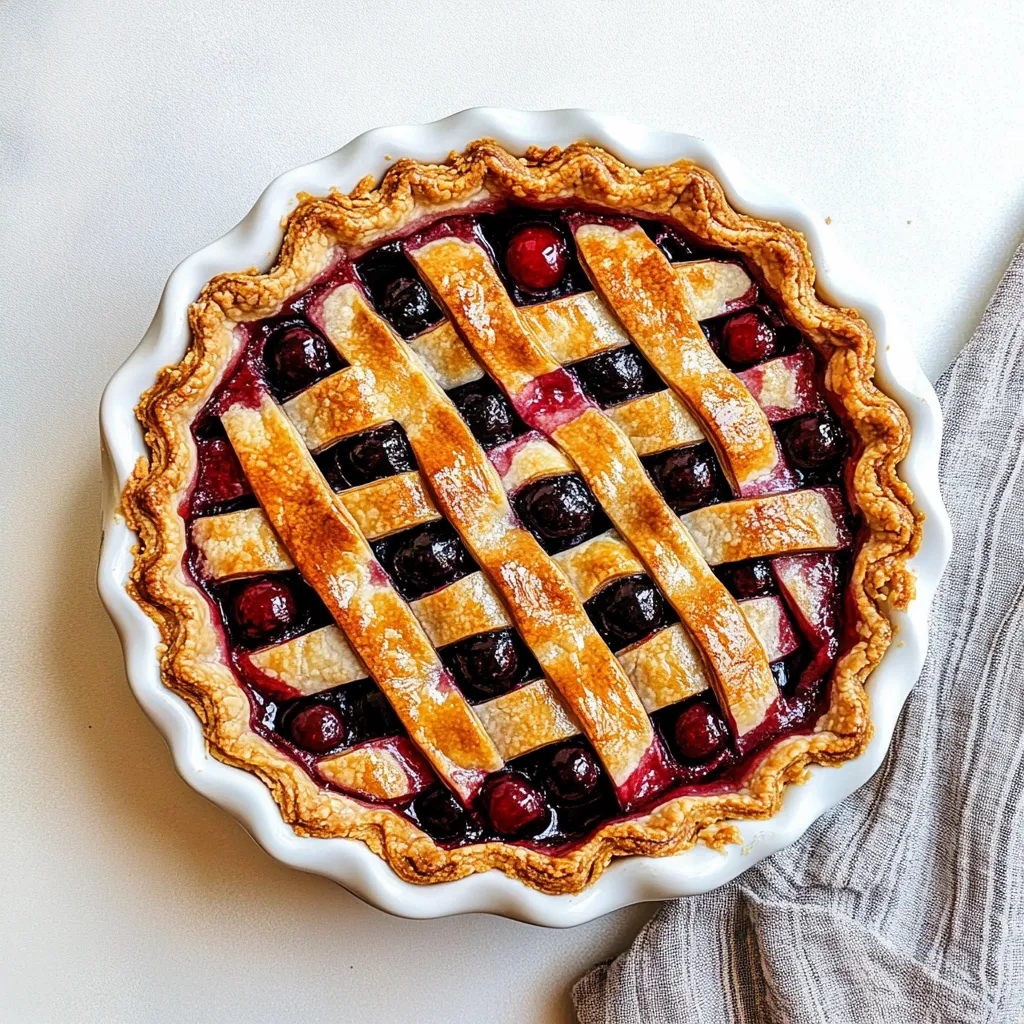
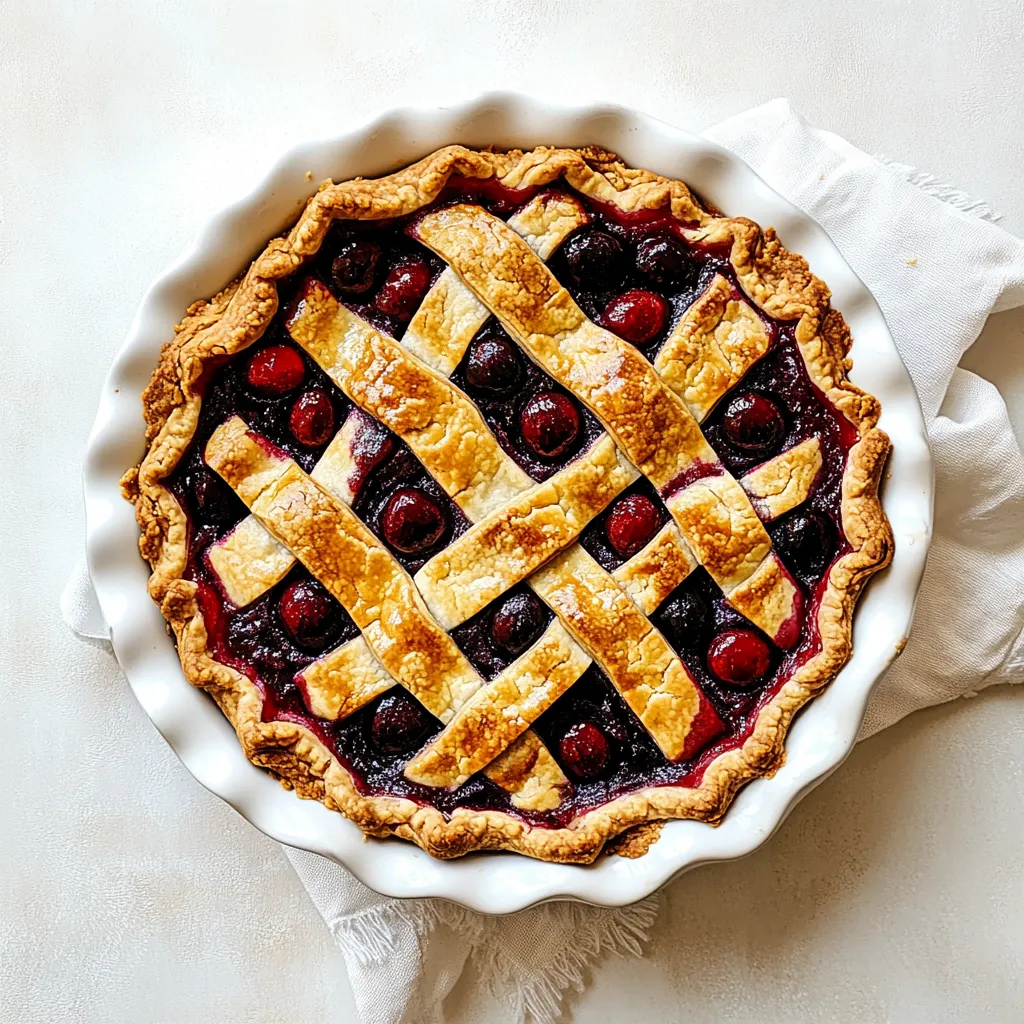
Cherry Pie
When I think of nostalgic desserts that bring me back to my childhood, nothing quite compares to Cherry Pie. The vibrant red filling, with its sweet and tart flavor, evokes memories of summer picnics and family gatherings in the backyard. I remember watching my grandmother roll out the pie crust, her hands expertly shaping each layer. The aroma of bubbling cherries and buttery crust baking in the oven is a scent that lingers in my mind. Baking a Cherry Pie is more than just following a recipe; it’s an experience that brings together the joy of cooking and the pleasure of sharing something delicious with loved ones. Every slice offers a taste of summer, even in the colder months, and it’s a treat that never fails to put a smile on my face.
Recipe Snapshot
2 hr 10 mins
60 mins
70 mins
Hard
320 kcal
3 g
Gluten-Free, Low FODMAP
12 g
Mixing Bowl, Baking Sheet, Chef’s Knife, Whisk, Frying Pan, Oven, Food Processor
Whether you’re celebrating a holiday or simply indulging in a sweet craving, making a Cherry Pie is a delightful endeavor. The combination of fresh, juicy cherries with a flaky, buttery crust is like a warm hug from your oven. It’s a recipe that requires patience and care, but the end result is worth every effort. Each pie that I bake becomes a cherished memory, passed down from generation to generation, a testament to the love and tradition of home cooking.
Why You’ll Love This Cherry Pie
1. A Burst of Flavor
The first reason I adore this Cherry Pie is the flavor explosion that hits your taste buds. The mix of sweet and slightly tart cherries creates a perfect balance, leaving you craving more. It’s like summer captured in a slice.
2. Nostalgic and Heartwarming
Baking this pie transports me back to my childhood. Helping my grandmother in the kitchen, we’d share stories and laughter. Each bite reminds me of those moments, making it more than just a dessert; it’s a vessel of memories.
3. Versatile and Seasonal
While cherries are the star, this pie can adapt. Whether you’re using fresh or frozen cherries, or adding other berries for a twist, the Cherry Pie can easily be customized to your liking, making it a year-round favorite.
4. A Showstopper
Whenever I serve a Cherry Pie, it becomes the centerpiece of any gathering. The vibrant color and beautiful lattice crust draw everyone in, sparking conversations and smiles, making it the perfect dessert for any occasion.
5. Easy to Make
Despite its impressive appearance, this pie is relatively simple to prepare. With just a handful of ingredients and straightforward steps, you can create a dessert that looks like it came from a bakery.
6. Perfect with Ice Cream
There’s something magical about pairing a warm slice of Cherry Pie with a scoop of vanilla ice cream. The creaminess complements the tart cherries beautifully, creating an unforgettable dessert experience.
Ingredients Overview for Cherry Pie
The ingredients for a Cherry Pie come together to create a harmonious blend of flavors. The key players include fresh or frozen cherries, which are the heart of the pie, and a buttery pie crust that cradles the filling. Each ingredient plays a critical role in developing the taste and texture that makes this dessert so beloved.
- 3 cups all-purpose flour, spooned into measuring cup and leveled-off: The foundation of the crust, providing structure and flakiness.
- 3 tablespoons sugar: Sweetens the crust and complements the tartness of the cherries.
- 1 teaspoon salt: Enhances the flavors and balances the sweetness.
- ¼ teaspoon baking powder: Aids in creating a light, tender crust.
- 2½ sticks (20 tablespoons) cold unsalted butter, sliced into 1-inch pieces: Adds richness and flavor to the crust.
- ½ cup ice cold water: Binds the ingredients and helps create a tender crust.
- 5¼ cups pitted cherries, from about 2 lbs (6 cups) whole cherries, fresh or frozen: The star ingredient that gives the pie its signature flavor.
- 2 tablespoons lemon juice: Brightens and enhances the flavor of the cherries.
- ¼ teaspoon almond extract: Adds a subtle nutty flavor that complements the cherries.
- ¾ cup + 2 tablespoons sugar: Sweetens the filling and helps it set.
- ¼ teaspoon salt: Balances the sweetness of the filling.
- ⅓ cup tapioca flour (also called tapioca starch): Acts as a thickening agent for the filling.
- 2 tablespoons unsalted butter, cut into small cubes: Dotting the filling with butter enhances the richness.
Recipe Directions for Cherry Pie
Making a Cherry Pie is a rewarding process that fills your kitchen with delicious aromas. Let’s dive into the steps to create this mouthwatering dessert!
- If using a food processor: Combine the flour, sugar, salt, and baking powder in the bowl of a food processor fitted with the metal blade. Pulse a few times to combine.
- Add the pieces of cold butter and pulse until the mixture is crumbly, with lots of pea-sized clumps of butter within. This will create a flaky texture.
- Pour in the ice cold water and pulse until the mixture is evenly moistened and very crumbly. You want it just wet enough to hold together.
- Dump the dough crumbles onto a work surface and divide into two even piles. Make two balls of dough and pat each one into a 5-inch disc.
- Wrap the discs in plastic wrap and refrigerate for at least 45 minutes and up to 3 days. Chilling the dough helps it to relax and makes rolling easier.
- If making by hand: In a large mixing bowl, whisk together the flour, sugar, salt, and baking powder. This helps evenly distribute the dry ingredients.
- Add the butter cubes and use a pastry cutter or two knives to cut the butter into the dry ingredients until the mixture resembles coarse crumbs. You want to see bits of butter for the best texture.
- Gradually add the ice cold water, mixing with a fork, and then your hands until the dough comes together into a ball.
- Divide the dough in half, shape into disks, wrap in plastic wrap, and refrigerate for at least 45 minutes and up to 3 days.
- In a large bowl, combine the pitted cherries, lemon juice, almond extract, sugar, salt, and tapioca flour. Toss until combined; don’t worry if the mixture is powdery—this is normal!
- Preheat the oven to 425°F and set an oven rack in the lower third position. Line a baking sheet with aluminum foil to catch any juices that may bubble over.
- Prepare the bottom crust: Remove one disc of dough from the refrigerator. Lightly dust a clean work surface with flour and place the dough on it; sprinkle a bit of flour over the dough as well. Gently knead the dough with your hands just until it becomes soft and malleable.
- Roll the dough out into a 14-inch circle, adding more flour as needed to prevent sticking. Carefully lift the dough by draping it over your rolling pin and transfer it to a 9-inch deep-dish pie pan.
- Gently press the dough into the pan, making sure to ease it into place without stretching. Trim the edges of the dough to extend about ½ inch beyond the pie pan’s lip.
- Fill the pie: Transfer the filling into the crust and press it into an even layer (do not mound). Dot the cherries with the remaining butter. Refrigerate while you prepare the top crust.
- Prepare the lattice top crust: Remove the top disc of dough from the refrigerator and roll it out into a 10×15-inch rectangle. Use a pizza or pastry cutter to trim the edges and cut the dough into 14 one-inch-wide strips.
- Retrieve the filled pie from the refrigerator. Lay half of the strips horizontally over the pie filling, leaving about ½ inch of space between each strip.
- Fold back every other strip halfway over itself. Place one strip of dough vertically over the unfolded strips.
- Unfold the folded strips over the new strip, then fold back the alternating strips that were previously left unfolded.
- Lay another strip of dough parallel to the first vertical strip, about ½ inch away from it. Repeat the process, folding back the strips as necessary, until the lattice crust covers the entire pie.
- Trim any excess dough from the edges of the lattice strips, leaving a slight overhang. Fold the edges of the bottom crust over the lattice strips, then crimp or flute the edges to seal the pie.
- Place the pie on the lined baking sheet and bake at 425°F for 20 minutes. Reduce the oven temperature to 375°F and continue baking for an additional 60 to 70 minutes.
- The pie is done when the crust is golden brown and the filling is bubbling both on the edges and in the center (if you have a digital thermometer, it should be at least 213°F in the center).
- Keep an eye on the pie during the second half of baking and tent lightly with foil if it’s getting too brown on top.
- Immediately move the hot pie off the foil and place it on a heat-proof surface. If necessary, take a wad of wet paper towels and wipe any cherry juice from the edges.
- Let the pie cool completely before slicing, at least 8 hours or overnight. Resist the temptation to cut into the pie while it’s even slightly warm, or you will end up with cherry soup!
- Once cooled, you can keep the pie at room temperature for up to 2 days, covering it loosely with foil to prevent it from drying out. If you need to store the pie for longer than 2 days, place it in the refrigerator, covered with plastic wrap or aluminum foil, and store for up to 4 days.
Things Worth Knowing
- Adjusting Sweetness: If you prefer a sweeter pie, feel free to add more sugar to the cherry filling. Just keep in mind that it should balance with the tartness of the cherries.
- Preventing a Soggy Bottom: Ensure your crust is pre-baked slightly before adding the filling to help prevent it from becoming soggy.
- Testing for Doneness: Use a digital thermometer to check that the center of the pie reaches at least 213°F to ensure the filling is set.
- Make Ahead: You can prepare the pie crust ahead of time and freeze it. Just thaw it in the fridge before using.
- Serving Warm: Letting the pie cool completely allows the filling to set, but serving it slightly warm with ice cream can elevate it to another level!
Recipe Variations about Cherry Pie
If you’re looking to mix things up, there are plenty of fun variations to explore with your Cherry Pie. Let’s dive into some delightful options!
- Swap Cherries: Use other fruits like blueberries or raspberries for a berry medley pie.
- Spice it Up: Add a pinch of cinnamon or nutmeg to the filling for a warm spice undertone.
- Different Crusts: Try a crumb topping instead of a lattice crust for a different texture.
- Chocolate Addition: Fold in some chocolate chips with the cherries for a decadent twist.
- Gluten-Free Version: Substitute the all-purpose flour with a gluten-free blend to accommodate dietary needs.
What Complements This Cherry Pie
Serving a Cherry Pie creates a wonderful opportunity to enhance your meal with delicious accompaniments. Here are some ideas for pairing this classic dessert:
- Vanilla Ice Cream: A scoop of creamy vanilla ice cream is the perfect match for a warm slice of pie.
- Whipped Cream: Light and airy whipped cream adds a delightful touch on top of each slice.
- Fresh Mint: Garnishing with fresh mint leaves provides a pop of color and refreshing flavor.
- Cheese Platter: Pair with a cheese platter featuring sharp cheddar for a sweet and savory contrast.
- Seasonal Fruits: Fresh seasonal fruits like berries make for lovely sides that complement the pie.
- Tea or Coffee: A warm cup of tea or coffee rounds the meal beautifully, enhancing the overall experience.
FAQ
Conclusion
This Cherry Pie is truly special, combining the sweet and tart flavors of cherries with a flaky, buttery crust that everyone loves. I encourage you to try making this dessert that brings joy and nostalgia to the table. Whether enjoyed warm or cold, this pie is sure to create lasting memories with each delicious bite.

Cherry Pie
Equipment
- Mixing Bowl
- Baking Sheet
- Chef's Knife
- Whisk
- Frying Pan
- Oven
- Food Processor
Ingredients
- 3 cups all-purpose flour spooned into measuring cup and leveled-off
- 3 tablespoons sugar
- 1 teaspoon salt
- ¼ teaspoon baking powder
- 2½ sticks cold unsalted butter sliced into 1-inch pieces
- ½ cup ice cold water
- 5¼ cups pitted cherries from about 2 lbs (6 cups) whole cherries, fresh or frozen
- 2 tablespoons lemon juice
- ¼ teaspoon almond extract
- ¾ cup sugar
- ¼ teaspoon salt
- ⅓ cup tapioca flour (also called tapioca starch)
- 2 tablespoons unsalted butter cut into small cubes
Instructions
- If using a food processor: Combine the flour, sugar, salt, and baking powder in the bowl of a food processor fitted with the metal blade. Pulse a few times to combine.
- Add the pieces of cold butter and pulse until the mixture is crumbly, with lots of pea-sized clumps of butter within. This will create a flaky texture.
- Pour in the ice cold water and pulse until the mixture is evenly moistened and very crumbly. You want it just wet enough to hold together.
- Dump the dough crumbles onto a work surface and divide into two even piles. Make two balls of dough and pat each one into a 5-inch disc.
- Wrap the discs in plastic wrap and refrigerate for at least 45 minutes and up to 3 days. Chilling the dough helps it to relax and makes rolling easier.
- If making by hand: In a large mixing bowl, whisk together the flour, sugar, salt, and baking powder. This helps evenly distribute the dry ingredients.
- Add the butter cubes and use a pastry cutter or two knives to cut the butter into the dry ingredients until the mixture resembles coarse crumbs. You want to see bits of butter for the best texture.
- Gradually add the ice cold water, mixing with a fork, and then your hands until the dough comes together into a ball.
- Divide the dough in half, shape into disks, wrap in plastic wrap, and refrigerate for at least 45 minutes and up to 3 days.
- In a large bowl, combine the pitted cherries, lemon juice, almond extract, sugar, salt, and tapioca flour. Toss until combined; don’t worry if the mixture is powdery—this is normal!
- Preheat the oven to 425°F and set an oven rack in the lower third position. Line a baking sheet with aluminum foil to catch any juices that may bubble over.
- Prepare the bottom crust: Remove one disc of dough from the refrigerator. Lightly dust a clean work surface with flour and place the dough on it; sprinkle a bit of flour over the dough as well. Gently knead the dough with your hands just until it becomes soft and malleable.
- Roll the dough out into a 14-inch circle, adding more flour as needed to prevent sticking. Carefully lift the dough by draping it over your rolling pin and transfer it to a 9-inch deep-dish pie pan.
- Gently press the dough into the pan, making sure to ease it into place without stretching. Trim the edges of the dough to extend about ½ inch beyond the pie pan's lip.
- Fill the pie: Transfer the filling into the crust and press it into an even layer (do not mound). Dot the cherries with the remaining butter. Refrigerate while you prepare the top crust.
- Prepare the lattice top crust: Remove the top disc of dough from the refrigerator and roll it out into a 10×15-inch rectangle. Use a pizza or pastry cutter to trim the edges and cut the dough into 14 one-inch-wide strips.
- Retrieve the filled pie from the refrigerator. Lay half of the strips horizontally over the pie filling, leaving about ½ inch of space between each strip.
- Fold back every other strip halfway over itself. Place one strip of dough vertically over the unfolded strips.
- Unfold the folded strips over the new strip, then fold back the alternating strips that were previously left unfolded.
- Lay another strip of dough parallel to the first vertical strip, about ½ inch away from it. Repeat the process, folding back the strips as necessary, until the lattice crust covers the entire pie.
- Trim any excess dough from the edges of the lattice strips, leaving a slight overhang. Fold the edges of the bottom crust over the lattice strips, then crimp or flute the edges to seal the pie.
- Place the pie on the lined baking sheet and bake at 425°F for 20 minutes. Reduce the oven temperature to 375°F and continue baking for an additional 60 to 70 minutes.
- The pie is done when the crust is golden brown and the filling is bubbling both on the edges and in the center (if you have a digital thermometer, it should be at least 213°F in the center).
- Keep an eye on the pie during the second half of baking and tent lightly with foil if it’s getting too brown on top.
- Immediately move the hot pie off the foil and place it on a heat-proof surface. If necessary, take a wad of wet paper towels and wipe any cherry juice from the edges.
- Let the pie cool completely before slicing, at least 8 hours or overnight. Resist the temptation to cut into the pie while it’s even slightly warm, or you will end up with cherry soup!
- Once cooled, you can keep the pie at room temperature for up to 2 days, covering it loosely with foil to prevent it from drying out. If you need to store the pie for longer than 2 days, place it in the refrigerator, covered with plastic wrap or aluminum foil, and store for up to 4 days.
Notes
- Tip 1: It’s normal for the cherry juices to bubble out of the pan towards the end.
- Tip 2: The cooking time will depend on the type of pan you use and whether you use frozen cherries (count on an extra 10 to 15 minutes if using frozen).
- Tip 3: It is critical that the pie is boiling in the middle or reaches 213°F, or it will not set up properly.
- Tip 4: Don’t be tempted to reduce the sugar—it is needed for the pie to set.